![]()
Ver 1.0 Date 03/02/2015
How to Configure Group Access Control
Overview
A service desk engineer can view all service desk records of the project to which he is assigned. To restrict access to the service desk records belonging to a particular department or location, a rule has to be defined in every project. This is particularly helpful in large organizations as it restricts a service desk engineer to viewing service desk records of his specialized area only.
Step 1: Add Access Control
· In the Settings panel, click on the '+' sign to expand “Group Access Control”. Click on Access Control to display the Access Control listing page. Click “ADD” to display a screen as shown below.
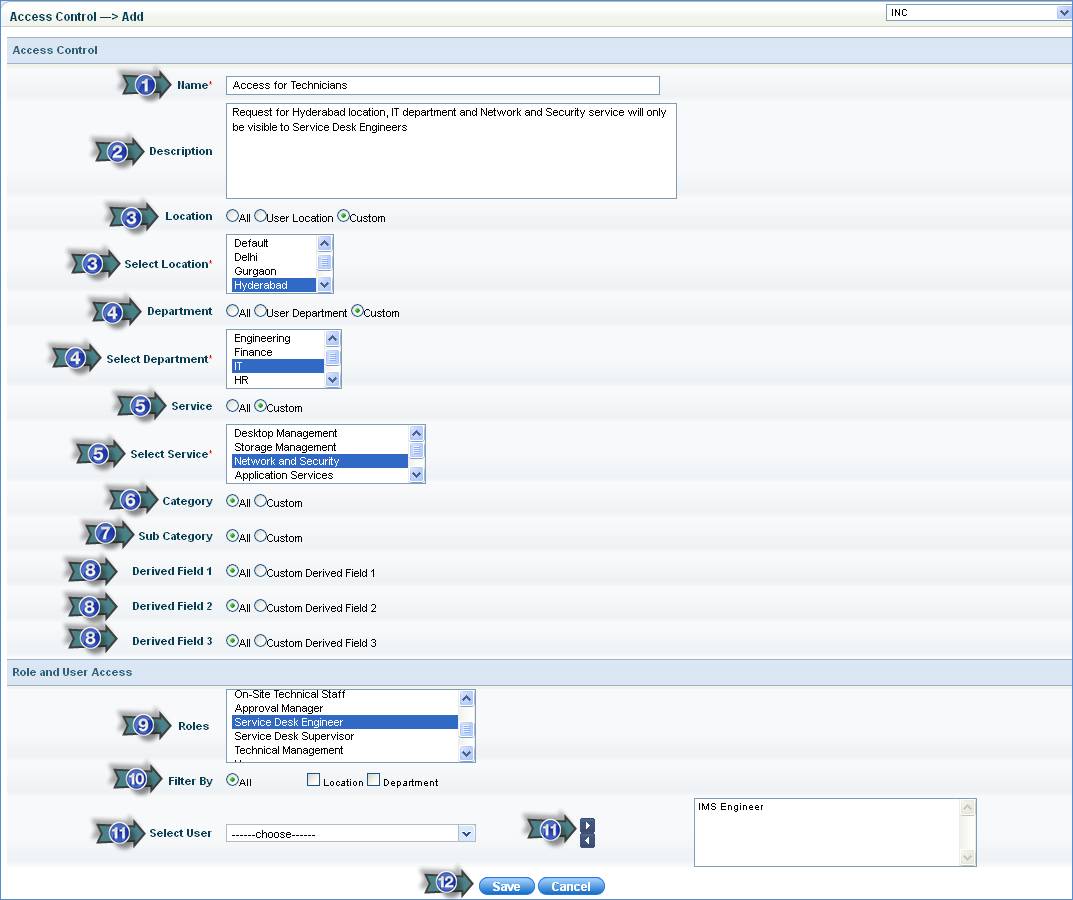
1. Enter the name of the access control rule
2. Enter the description
3. Location
All – Can view service desk records belonging to all the locations
User Location – Can view service desk records of the logged in user’s location.
Custom – Select the specific locations. Can view service desk records for the locations selected from the “Select Location” box
All – Can view service desk records belonging to all the departments
4. User Departments
All – Can view service desk records of the logged in user’s department
Custom – Select the specific departments. Can view service desk records for the departments selected from the “Select Department” box
5. Service
All - Can view service desk records belonging to all the services.
Custom - Select the specific services. Can view service desk records for the services selected from the “Select Services” box
6. Category
All - Can view service desk records belonging to all the categories
Custom - Select the specific category. Can view service desk records for the specified category from the “Select Subcategory” box
7. Sub Category
All - Can view service desk records belonging to all sub categories
Custom - Select the specific category. Can view service desk records for the specified sub category from the “Select Category” box
8. Derived Fields
All - Can view service desk records belonging to all the derived fields
Custom - Select the specific derived field. Can view service desk records for the specified derived field from the “Select Derived Field” box
9. Select one or multiple roles. The access privileges will be for these role/ roles
10. Filter By
All – displays all the users
Location – Select this option to display a drop down “Select Location” with all the locations
Department - Select this option to display a drop down “Select Department” with all the departments
11. In this box the list of users will be displayed depending on the condition selected in “Filter By” option
12. Click “Save” to save the group access rule
Note: These records will be displayed in the “All Requests/All Incidents/All Problems/All Changes” tab. By default this tab will be visible only to a service desk engineer. This tab can be made visible for other users by enabling “Display All Request tab for Service Desk Users” variable in the Config Settings section
Step 2: Team Configuration
SapphireIMS provides a facility to create teams of service desk users to work on service desk records. A service desk user belonging to the team can only view tickets of all other team members including his tickets in “My Team Incidents / My Team Problems / My Team Changes/My Team Requests” as the case may be.
· In the Settings panel, click on the '+' sign to expand “Group Access Control”. Click on “Team Configuration” to display the Team Configuration listing page. Click “ADD”
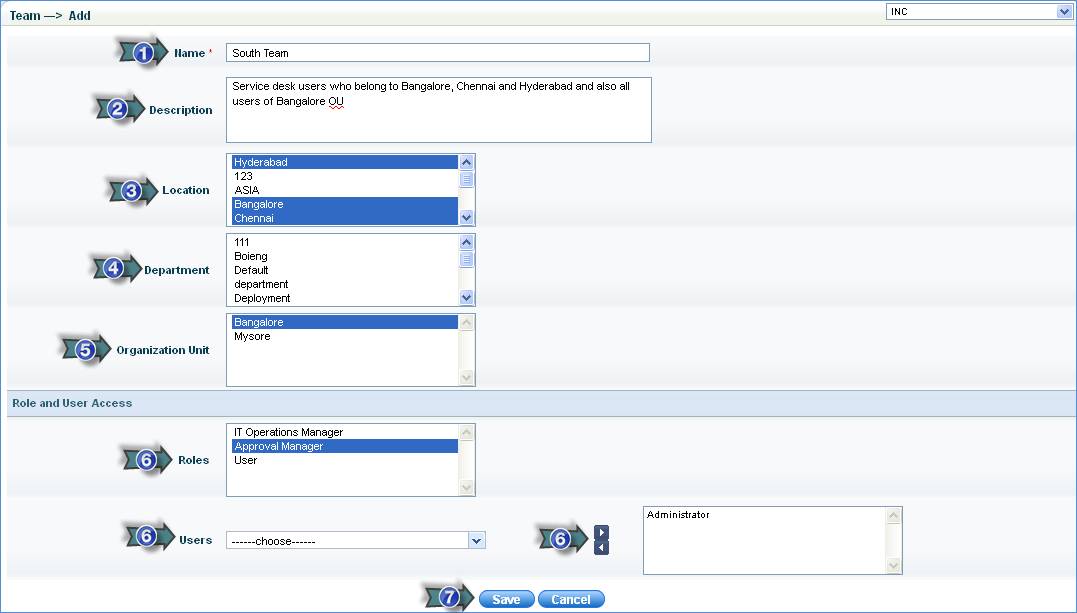
1. Enter the name of the team
2. Enter text to describe the team
3. Select the location of the team
4. Select the department of the team
5. Select the OU to which the team members belong to
6. Select the roles and the users who will belong to the team
Note: Only “Submitter” and “Approval Manager” roles are listed here
7. Click “Save” button to save the team details