![]()
Ver 1.1 Date 02/11/2015
How to Configure Software Normalization
Overview
Normalized Systems is a theory to design information systems. In Normalized Systems theory it's believed that today's IT problems are symptoms of something deeper and more fundamental. The theory is the result of identifying these fundamental principles, patterns and other methodological elements for building evolvable software architectures for enterprise systems. Indeed, the basic assumption of Normalized Systems is that information systems should be able to evolve over time, and should be designed to accommodate change.
SapphireIMS has adopted normalization of software as a means to categorize installed software based on manufacturer, product, category or type. This helps you to define software mapping rules to configure the mapping criteria of the software, based on which you can select the software to be approved to the respective manufacturer, category, product or type. Similarly, you can also normalize executable or a suite of software components.
For custom software, you can specify the type of software categorization (Manufacturer, Category or Type) to happen at the time of discovery of the software applications
Step 1: Create Software Normalization Families
There are four types of Software Mapping Family available. They are Manufacturer, Product, Category and Type
· Go to Settings Tab-> Software Normalization-> Software Normalization Families. Click on “Add”
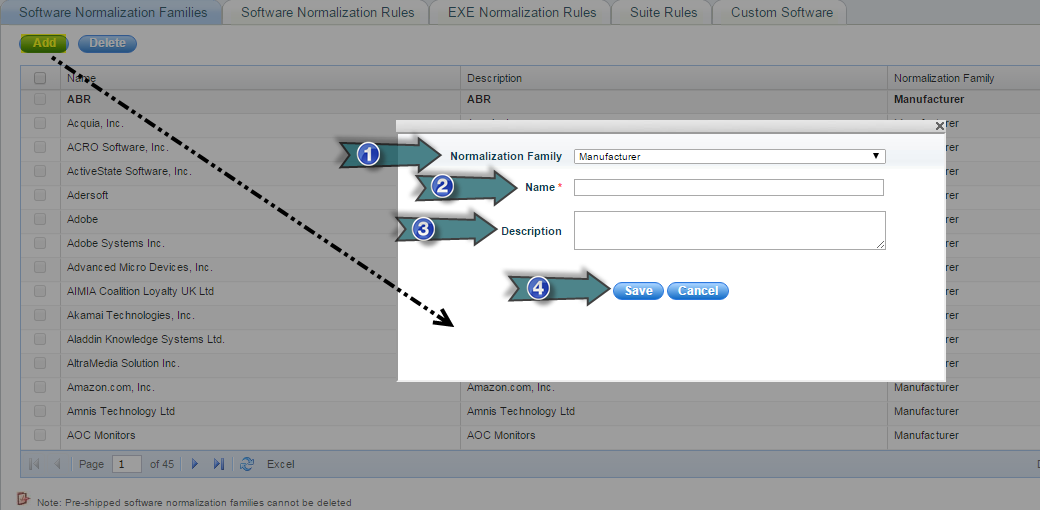
1. Select Mapping Family as Manufacturer, Product, Category or Type
2. Type the Name of the Manufacturer, Product, Category or Type
3. Type the Description of the Manufacturer, Product, Category or Type
4. Click “Save”
Step 2: Add software to software normalization family
· In the “Software Normalization Families” listing page, click the software family to add the list of software belonging to the normalization family
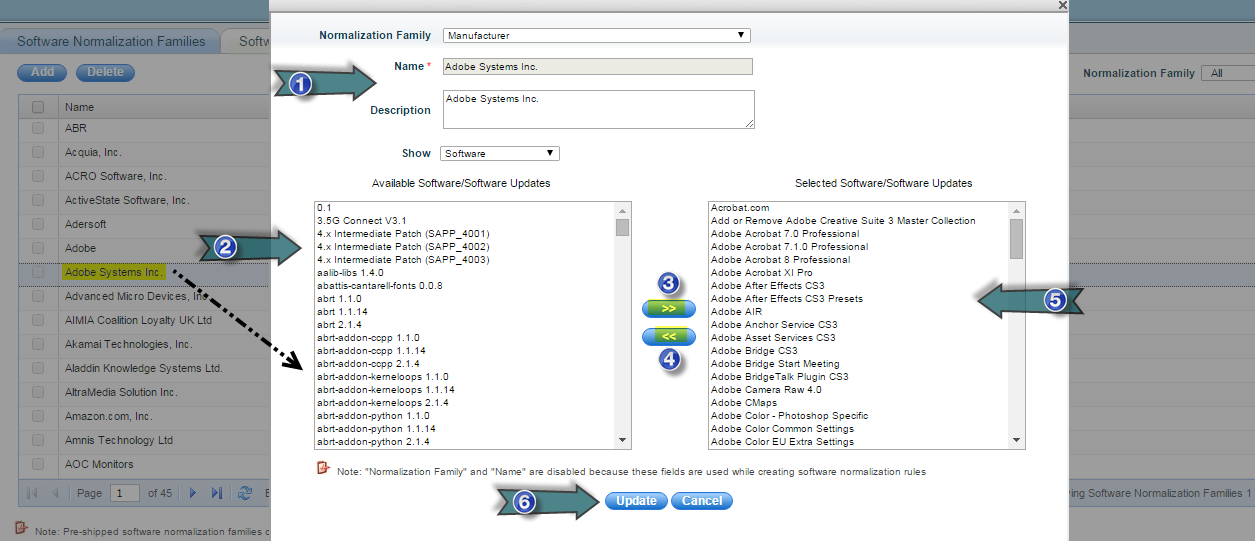
1. You can edit the description of the software normalization family here
2. List of software discovered through inventory which are not mapped to the software normalization family
3. Click here to include the selected software to the software normalization family
4. Click here to exclude the selected software
5. List of software that are mapped to the software family
6. Click “Update” to save the changes
Note: For software that has Manufacturer, Category, Product or Type as “Unknown”, no update is allowed. But the software can be mapped to a particular manufacturer, product, category or type
Step 3: Software Normalization Rules
In order to associate software with a particular manufacturer, product, category or type, a software normalization rule has to be configured as explained below. By default, software is normalized as soon as it is discovered. If the software has to be explicitly normalized, the software normalization rule has to be configured.
Note: The default schedule for normalizing the software using software normalization auto approved rules is every 6 Hours. This schedule can be changed from Settings Tab-> Software Normalization-> Manage Software Normalization Rules tab by clicking on the link as shown in the below screen shot
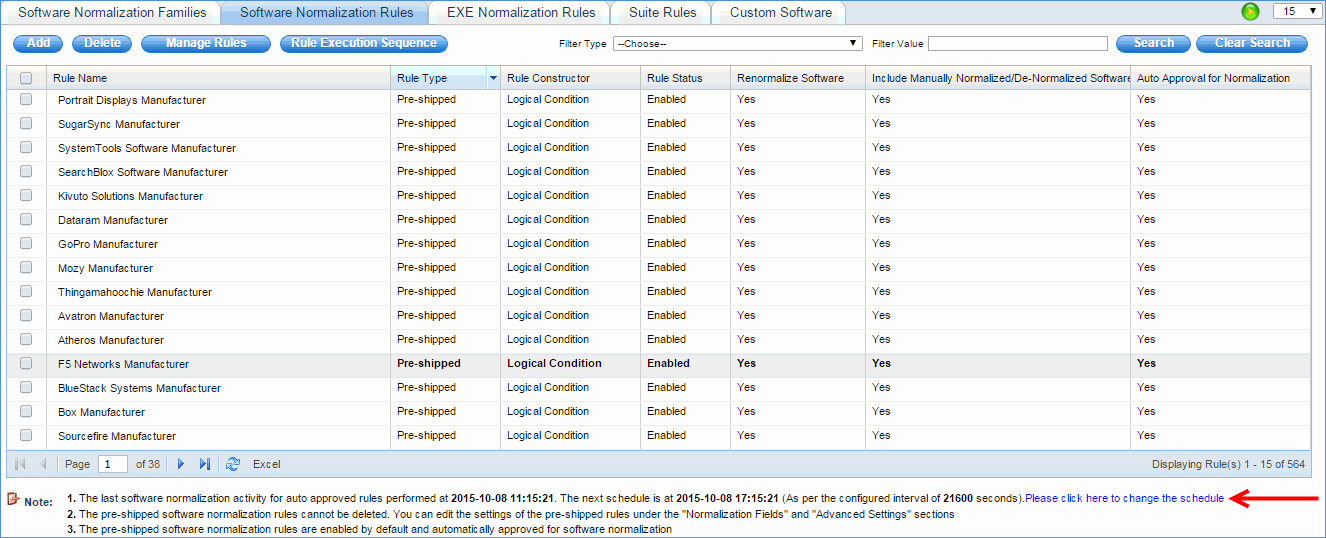
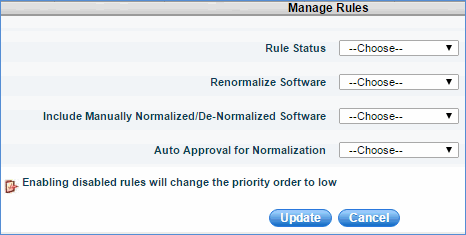
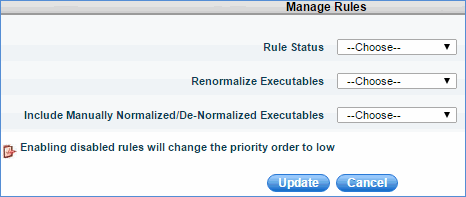
· Select a software and click "Manage Rules" to modify the following settings of the Software Normalization Rules in bulk
1. Rule Status
2. Renormalize Software
3. Include Manually Normalized/De-Normalized Software
4. Auto Approval for Normalization
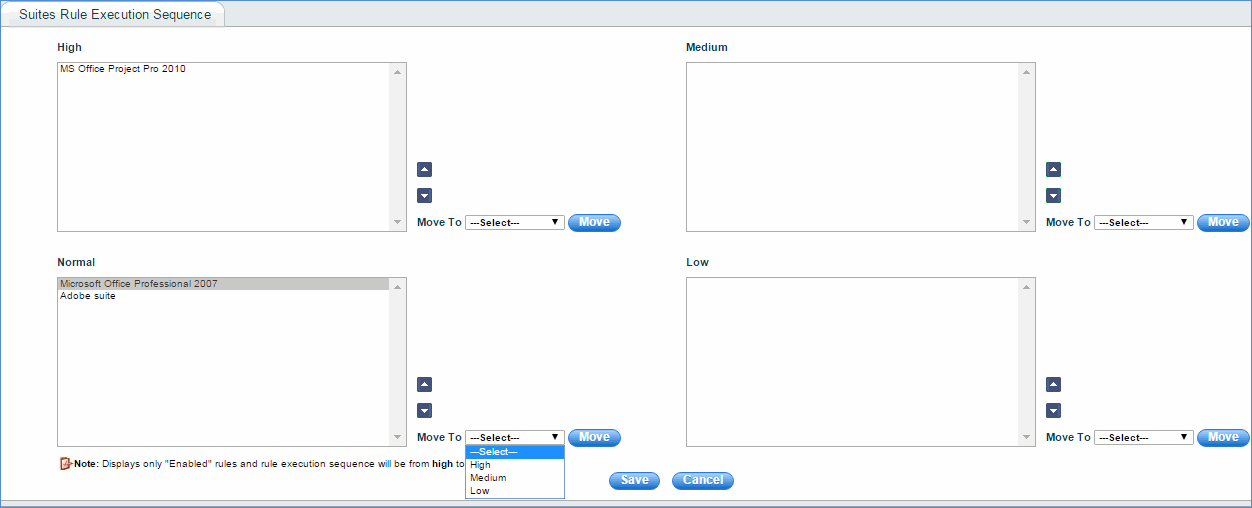
· Click the “Rule Execution Sequence” button to define the order in which the Software Normalization Rules will be executed
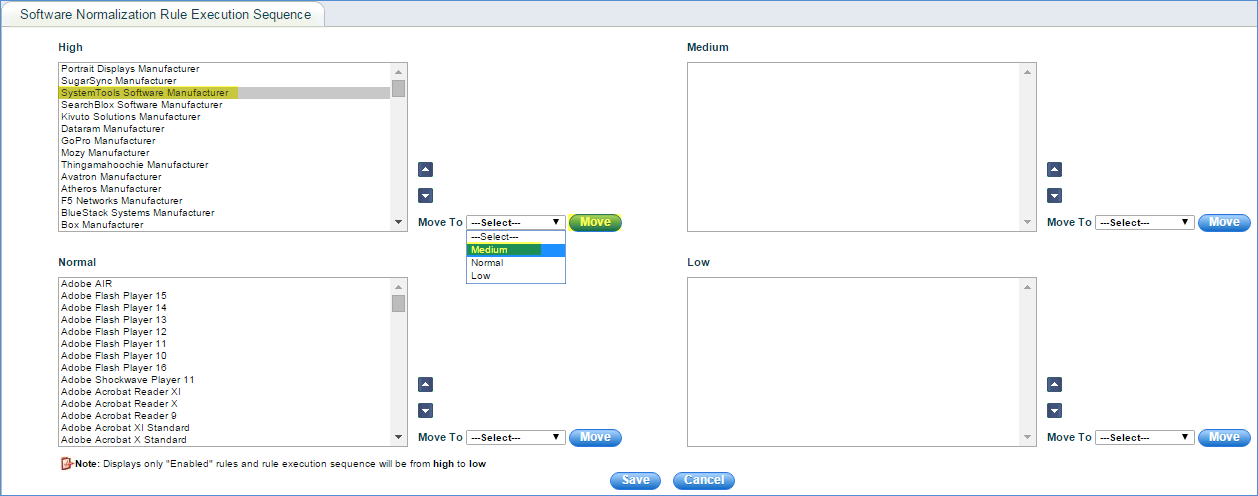
1. Select the rules (displays only enabled rules)
2. Click "Up" or "Down" buttons.
3. Select "Move To" option and click the "Move" button
4. Click "Save"
There are 2 types of Software Normalization Rules: Logical Condition Based and Regular Expression Based
Step 3.1: Logical Condition Based Rules
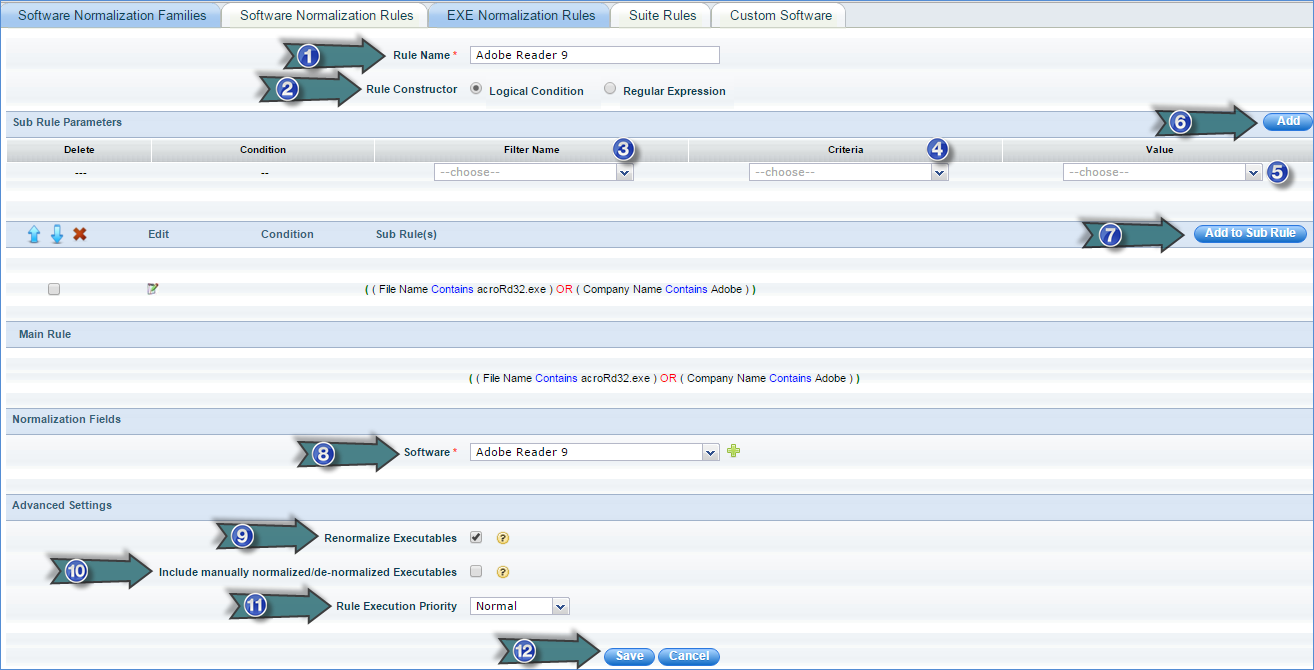
· Click “Software Normalization Rules” > “ADD”
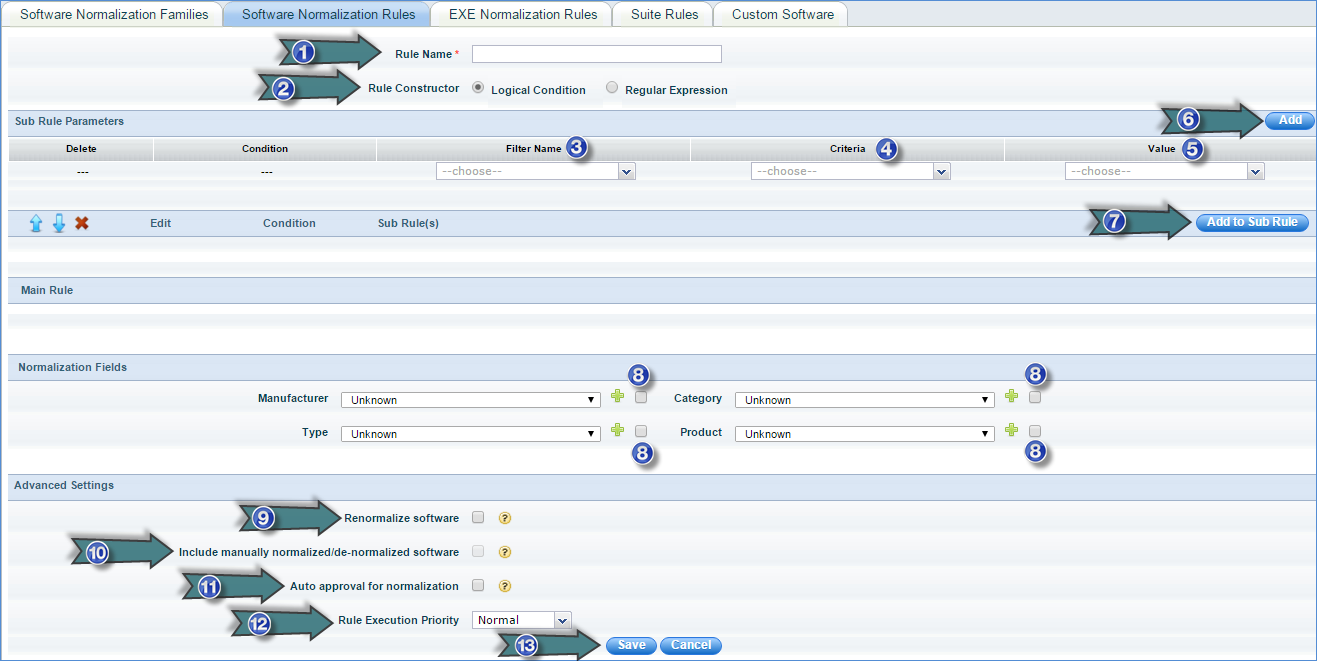
1. Enter the software normalization rule name
2. Select “Rule Constructor” as “Logical Condition Based”
3. Select “Filter Type” (Software Description, Vendor, Manufacturer or Product)
4. Select Filter Criteria (Equal To, Not Equal To, Contains, Does Not Contain etc)
5. Click “Add”
6. Select a Rule or Sub Rule Logical Condition (AND/OR)
7. Click “Add to Sub Rule”
8. Select the Normalization Fields to which this rule will map the matching software (Check the box besides each Normalization Field to include that Normalization Filed for software normalization)
9. Check “Renormalize software” if you want this rule to include that software which is already normalized.
10. Check "Include manually normalized/de-normalized software" if you want to include software that is manually normalized or de-normalized from Inventory > Installed Software > Software
Notes:
1. This option is enabled only if "Renormalize software" is selected
2. A software is considered as normalized if any one of its normalization fields (i.e. Manufacturer, Category, Type or Product) is not set to "Unknown"
3. A software is considered as de-normalized if all of its normalization fields (i.e. Manufacturer, Category, Type or Product) are set to "Unknown"
11. Check “Auto approval for normalization” if you want this rule to normalize the software automatically without any approval
12. Select the rule execution priority
13. Click “Save”
Step 3.2: Regular Expression Based Rules
· Click “Software Normalization Rules” > “ADD”
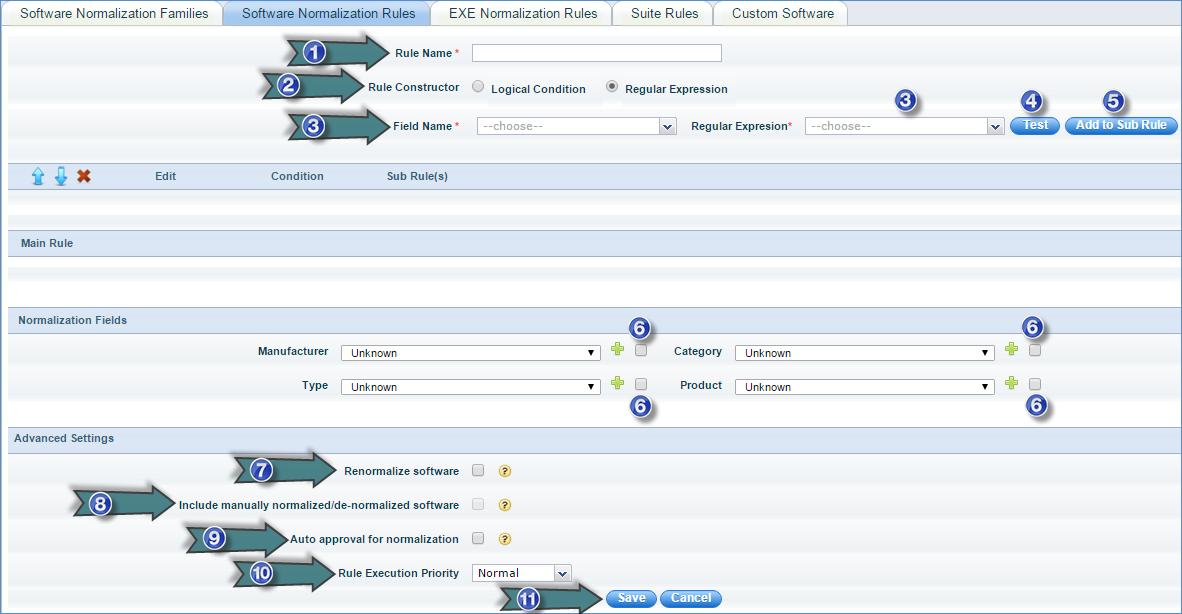
1. Type the Name of the Software Normalization Rule
2. Select “Rule Constructor” as “Regular Expression Based”
3. Select the Regular Expression for Software Description, Vendor, Manufacturer and Product based on the required Normalization Logic with AND/OR logic
4. Click “Test” to check the selected regular expression
5. Click “Add to Sub Rule”
6. Select the Normalization Fields to which this rule will map the matching software (Check the box besides each Normalization Field to include that Normalization Field for software normalization)
7. Check “Renormalize software” if you want this rule to include that software which is already normalized.
8. Check "Include manually normalized/de-normalized software" if you want to include software that is manually normalized or de-normalized from Inventory > Installed Software > Software
Notes:
1. This option is enabled only if "Renormalize software" is selected
2. A software is considered as normalized if any one of its normalization fields (i.e. Manufacturer, Category, Type or Product) is not set to "Unknown"
3. A software is considered as de- normalized if all of its normalization fields (i.e. Manufacturer, Category, Type or Product) are set to "Unknown"
9. Check “Auto approval for normalization” if you want this rule to normalize the software automatically without any approval
10. Select the rule execution priority
11. Click “Save”
Note: The above rule is used only to configure the software normalization criteria for the software. Later, the software has to be selected and approved to complete the software normalization process.
Step 4: EXE Normalization Rules
In order to associate an EXE with a particular software, an EXE normalization rule has to be configured as explained below.
If "Get Inventory Data" automation job is posted for "Extended Software Inventory", the executable is normalized or associated with the corresponding software. If the EXE has to be explicitly normalized, the EXE normalization rule has to be configured.
Note: The default schedule for normalizing the EXE using executable normalization is every 6 Hours. This schedule can be changed from Settings Tab-> Software Normalization-> EXE Normalization Rules tab by clicking on the link as shown in the below screen shot

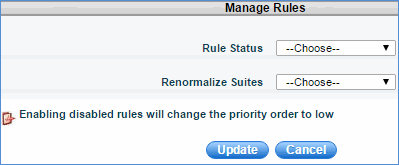
· Select an exe and click "Manage Rules" to modify the following settings of the EXE Normalization Rules in bulk
1.
Rule Status
2. Renormalize Executables
3. Include Manually Normalized/De-Normalized Executables
· Click “Rule Execution Sequence” button to define the order in which the EXE Normalization Rules will be executed
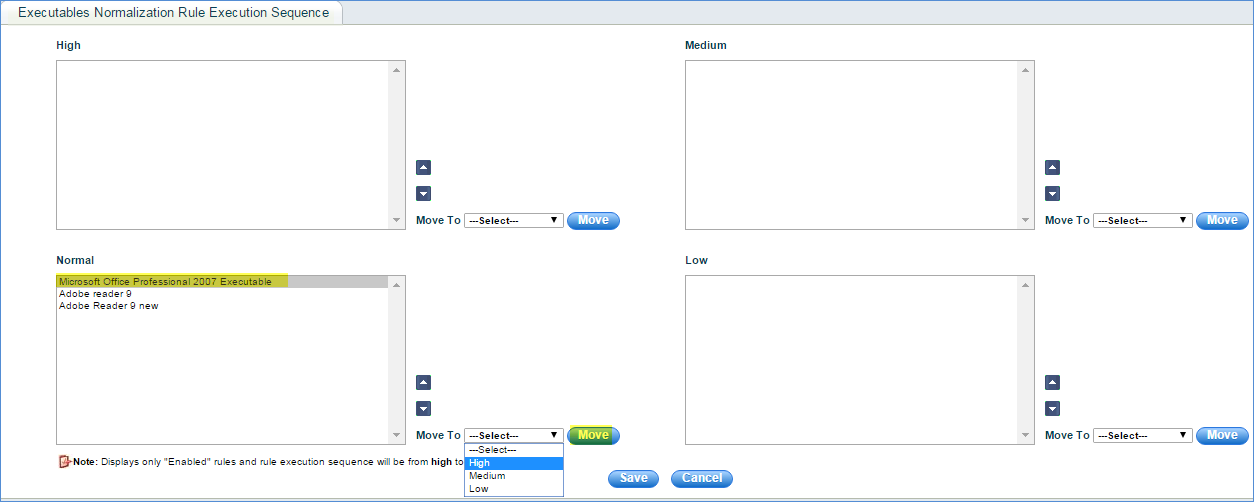
1. Select the rules (displays only enabled rules)
2. Click "Up" or "Down" buttons.
3. Select "Move To" option and click the "Move" button
4. Click "Save"
There are 2 types of EXE Normalization Rules: Logical Condition Based and Regular Expression Based
Step 4.1 Logical Condition Based Rules
· Click “EXE Normalization Rules” > “ADD”
1. Enter the EXE normalization rule name
2. Select “Rule Constructor” as “Logical Condition Based”
3. Select “Filter Name” (File Name, File Size (Bytes), File Version, Company Name, Product Name, Product Version, Copyright)
4. Select Filter Criteria (Equal To, Not Equal To, Contains, Does Not Contain etc.)
5. Select or type Value and click "Add"
6. Select the Condition (AND/OR) and select the sub rule
7. Click “Add to Sub Rule”
8. Select the Normalization Fields (Software) to which this rule will map the matching exe
9. Check “Renormalize Executables” if you want this rule to include those executables which are already normalized.
10. Check "Include manually normalized/de-normalized executables" if you want to include executables that are manually normalized or de-normalized from Inventory > Installed Software > Executables
Notes:
1. This option is enabled only if "Renormalize Executables" is selected
2. An executable is considered as normalized if its normalization fields (i.e. Software) is not set to "Unknown"
3. An executable is considered as de- normalized if its normalization fields (i.e. Software) is set to "Unknown"
11. Select "Rule Execution Priority"
12. Click “Save”
Step 4.2 Regular Expression Based Rules
· Go to Settings Tab-> Software Normalization-> EXE Normalization Rules tab and click “Add”
1. Type the Name of the EXE Normalization Rule
2. Select “Rule Constructor” as “Regular Expression Based”
3. Select the "Field Name" and the corresponding "Regular Expression" with AND/OR logic and click "Add to Sub Rule"
4. Select the Normalization Fields (Software) to which this rule will map the matching executable
5. Check “Renormalize Executables” if you want this rule to include those executables which are already normalized.
6. Check "Include manually normalized/de-normalized executables" if you want to include executables that are manually normalized or de-normalized from Inventory > Installed Software > Executables
Notes:
1. This option is enabled only if "Renormalize Executables" is selected
2. An executable is considered as normalized if its normalization fields (i.e. Software) is not set to "Unknown"
3. An executable is considered as de- normalized if its normalization fields (i.e. Software) is set to "Unknown"
7. Select "Rule Execution Priority"
8. Click “Save”
Note: The above rule is used only to configure the executable normalization criteria for the executable. Later, the executable has to be selected and approved to complete the executable normalization process.
Step 5: Suite Rules
In order to associate a suite with particular components, a suite normalization rule has to be configured as explained below.
Note: The default schedule for normalizing the Suite using suite normalization is every 6 Hours. This schedule can be changed from Settings Tab-> Software Normalization-> Suite Normalization Rules tab by clicking on the link as shown in the below screen shot

· Select a suite and click "Manage Rules" to modify the following settings of the Suite Normalization Rules in bulk
1. Rule Status
2. Renormalize Executables
· Click “Rule Execution Sequence” button to define the order in which the Suite Normalization Rules will be executed
1. Select the rules (displays only enabled rules)
2. Click "Up" or "Down" buttons.
3. Select "Move To" option and click the "Move" button
4. Click "Save"
Step 5.1: Add Suite Normalization Rule
· Click “Suite Normalization Rules” > “ADD”
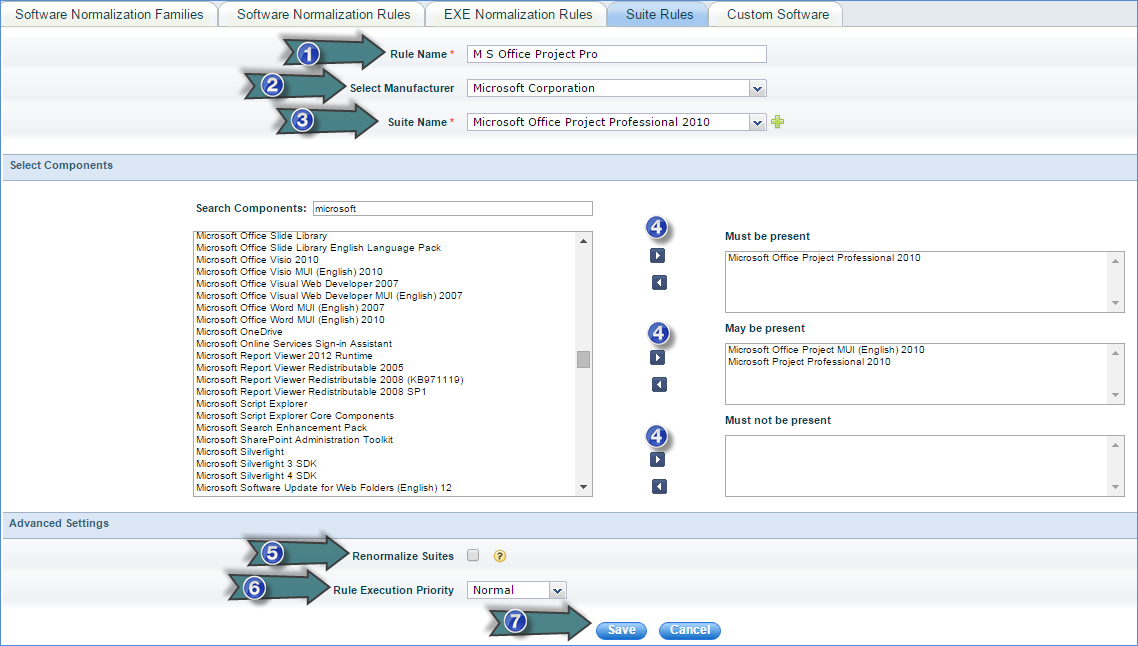
1. Enter the suite normalization rule name
2. Select the manufacturer from the list
3. Select the suite name from the list. Based on the suite name selected, components are listed
4. Select the components and move them to "Must be present", "May be present" or "Must not be present"
5. Check “Renormalize Suites” if you want this rule to include those suites which are already normalized.
6. Select "Rule Execution Priority"
7. Click "Save"
Step 6: Manage Custom Software
You can specify the type of software categorization (Manufacturer, Category, Product or Type) to happen at the time of discovery of the software applications.
Note: Custom software cannot be edited/deleted. This feature is used to on board software before it is collected through inventory. The custom software name should be same as the software name which is collected through inventory.
· Click “Manage Custom Software” > “ADD”
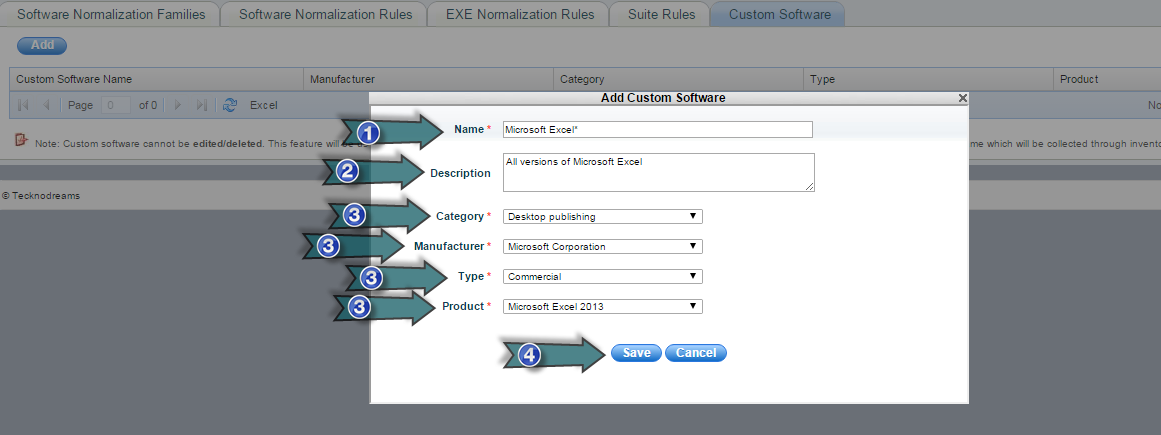
1. Enter the name of the software followed by regular expression
2. Enter a brief description of the software
3. Select the Category, Manufacturer, Type and Product which will be used to categorize the software
4. Click “Save”
Note: In case the Category, Manufacturer, Type or Product is not listed in the drop down, you need to add the same under “Software Normalization Configuration” as explained above. At the time of discovery, SapphireIMS scans the custom software list and if the corresponding entries for Category, Manufacturer, Type or Product are found, the software is automatically categorized; else Category, Manufacturer, Product and Type fields are displayed as “Unknown”
Step 7: Viewing Installed Software Dashboard

· Click on any software distribution dashboard to view the installed software listing
· Click on any node based distribution dashboard to view the installed nodes listing
Step 8: Run Auto Approved Rules
1. Click “Inventory” > “Installed Software” > “Software”
2. Click the ![]() (Run
Auto Approved Rules) button to run approved software normalization
rules
(Run
Auto Approved Rules) button to run approved software normalization
rules
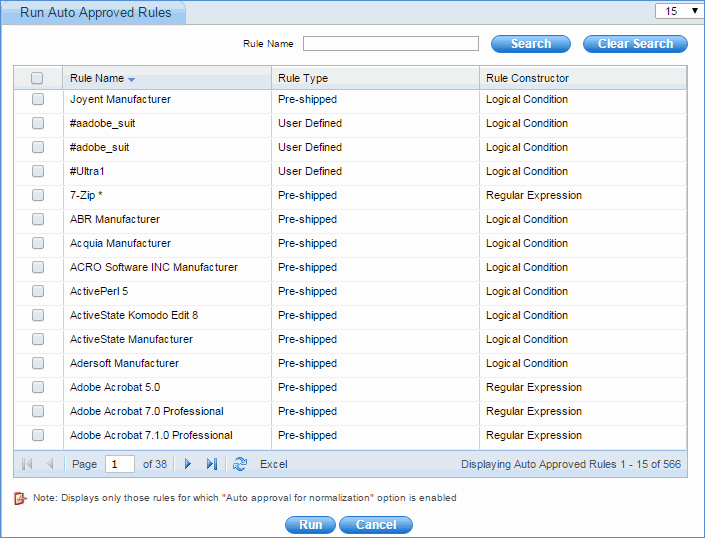
3. Check the required rules to be run
4. Click “Run”
Step 9: Run Manually Approved Rules
1. Click “Inventory” > “Installed Software” > “Software”
2. Click the ![]() (Approve
Software for Normalization) button to manually approve software for
normalization
(Approve
Software for Normalization) button to manually approve software for
normalization
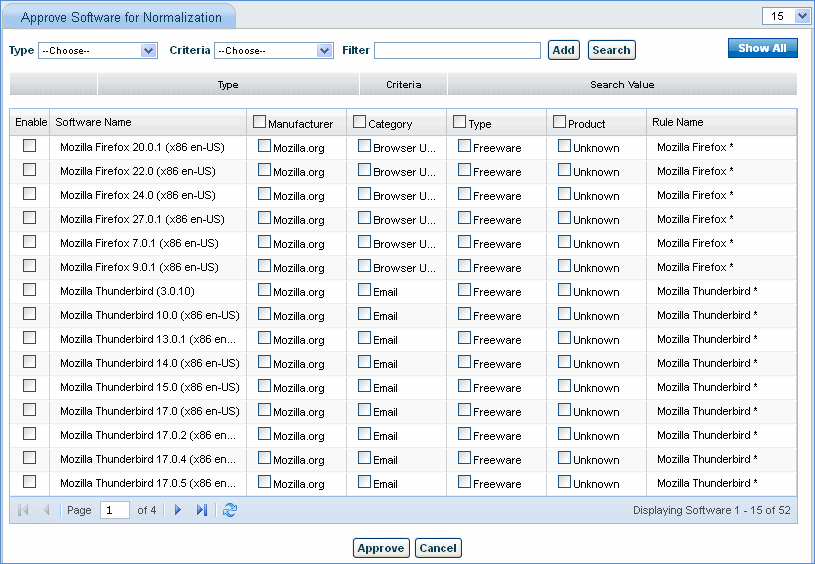
3. Check the required rules to be approved
4. Click “Approve”
Step 10: Normalizing Installed Software
1. Click Inventory > Installed Software > Software tab
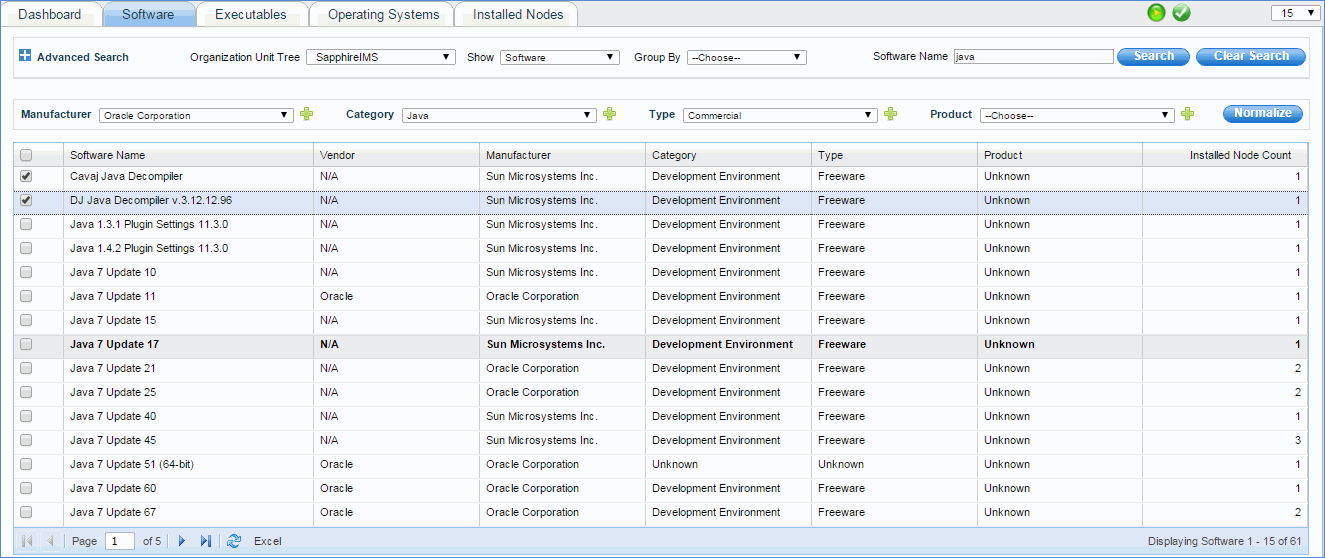
2. Select Manufacturer, Category, Type or Product
3. Check the installed software corresponding to the software mapping and click “Normalize”. The selected installed software is now mapped to the manufacturer, category, type or product specified
Group By
Select Group By option from the drop down box to view installed software/updates grouped on selected option.
Step 10.1: Normalizing Installed OS
· Click Inventory > Installed Software > Operating Systems tab. This tab provides the listing of all the operating systems installed that were discovered through the discovery process.
· Click 'Add Custom OS' to add an operating system
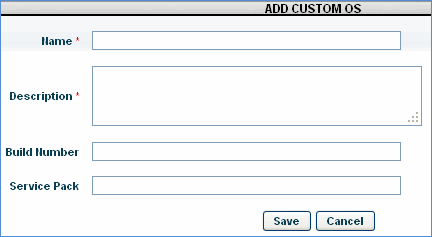
· Enter the “Name” and “Description” of the operating system
· Enter the “Build Number” and “Service Pack” of the operating system. This information can be got from the internet.