![]()
Ver 1.0 Date 03/02/2015
How to Send Email and SMS Notifications
Overview
The service desk notification templates provide standard notification texts for the different ITIL projects. Each of the existing templates can be modified to include different macros in the Mail Subject and your own content in the message body. Apart from the default set of Notification Templates, new templates can also be created.
Step 1: Configure SMTP Settings
The SMTP server needs to be configured to send out the service desk E-mail notifications. This configuration is project based which means that each project can have different SMTP server configuration for e-mail notifications related to service desk records.
· Go to Settings -> Advanced System Settings -> SMTP Settings
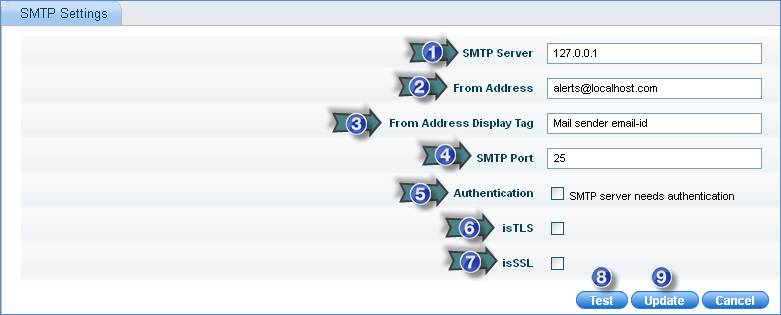
1. Enter the SMTP server name
2. Enter the e-mail address from which the notifications need to be sent
3. Enter the name that will be displayed as the “Sender”
4. Port on which SMTP service is running
5. Check this box if your SMTP server requires authentication. If checked, you need to provide a valid username and password; this will be used to authenticate the SMTP server.
6. Check this box to allow the client to connect to TLS-enabled server requesting a secure connection.
7. Check this box if SSL protocol has to be used for secured communication. The path of the SSL certificate has to be provided in the 'StartWebConsole.bat' file present in <Installed folder\SapphireIMS\WebManagement\bin>
8. Click the test button to verify the SMTP settings. This will initiate an e-mail transaction and send a test mail (to the same ID as a self test); if this is successful then the SMTP settings are correct. If this throws an error, then verify your SMTP settings
9. Click “Update” to save the SMTP settings
Step 2: Add notification template
1. In the Settings panel, click on the '+' sign to expand “Email & SMS Notifications”. Click on “Email Notification Templates” to display the Email Notification Templates listing page.
2. Click “ADD” to create a template
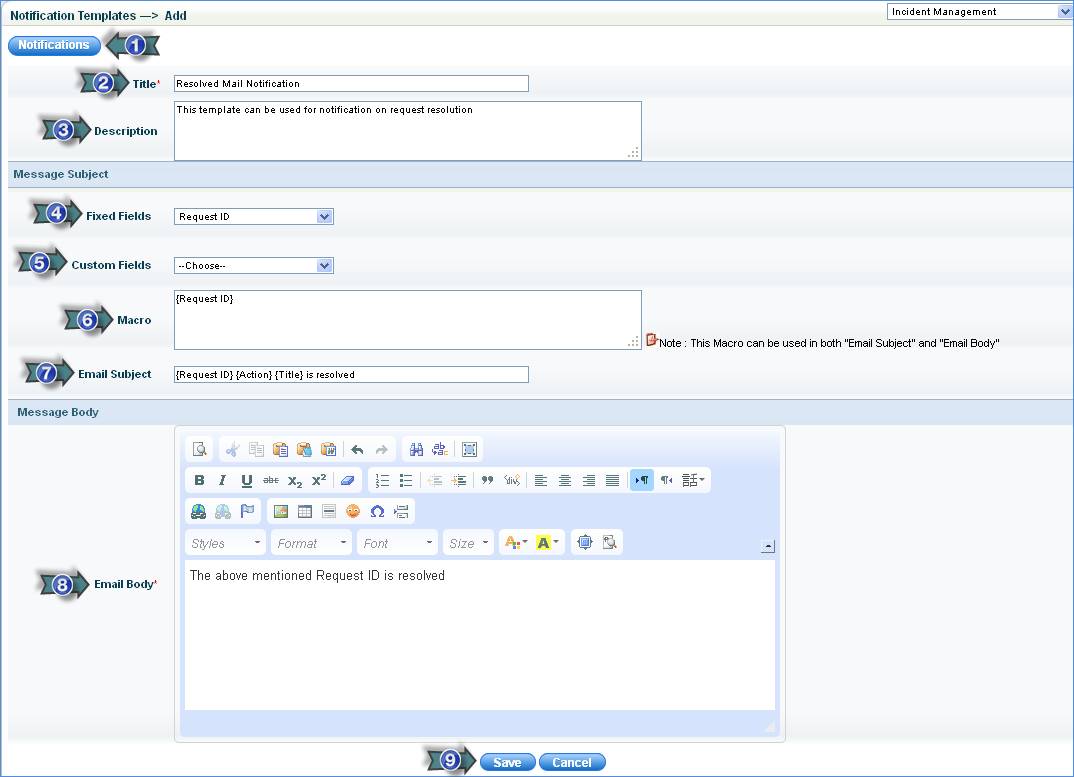
1. Click on this button to define a new notification rule
2. Enter the name of the notification template
3. Enter text to describe the template
4. Select the fixed fields from the drop down list
5. Select the additional fields from the drop down list
6. You can copy the macro for the fixed fields or custom fields in both "Email Subject" and "Email Body". You can select any number of macros from the drop down. For more details, refer www.sapphireims.com/help > Appendix section, Macros supported in SapphireIMS
7. The selected macros are listed here. You can add text along with the macros selected.
Note: The macros need to be in curly brackets, only then will they be replaced by the actual values.
8. Enter the text, which will be saved as the defined template. Use the editor given for a well- formatted message.
Note: To change the notification template text size, change the Config Settings key, 'Column width (Notification Template)' Also, the 'TemplateBody' field in table 'sd_notification_template' needs to be changed.
9. Click “Save”
Step 3: Add Logo
You can add the company logo to the e-mail. Click the “LOGO” button in the mail notification template listing page and select the position of the logo in the mail.
Step 4: Edit Notification Template
The notification template created in the above step can be modified. This is helpful if important details like “Approval Manager” and “Impacted Asset” need to be included in the notification mail. All the fixed fields present in the “Fixed Fields Configuration” section can be configured to be included in the mail notification by following the steps below.
1. Click the specific Notification Template.
2.
Click the icon ‘ ![]() ’ to display a screen as shown
below. A list of fixed fields is displayed.
’ to display a screen as shown
below. A list of fixed fields is displayed.
· The additional parameters are displayed in the “Message Summary” section of the Notification Template as shown below.
· Given below is the image of the mail sent from SapphireIMS for the “Acknowledgement Info Template”

Note: The Acknowledgement Info Template has to be selected in the “Notification Rule” settings as explained in the next step for the generation of the above mail.
Step 5: Add Email Notification Rules
SapphireIMS allows you to send e-mail as well as SMS notifications related to any change in service desk records.
Changes could be change in the state of the record, modifications to the record, addition or modification to enclosures or change in the work group. For example, notification rules can be configured for sending mail notification templates for different states (New/Assign/Close)
In addition to standard notification templates, user defined templates can be created and notification rules can be configured for sending the notification templates for changes as desired.
The mail notifications are sent as per the notification rule configurations.
SapphireIMS also provides the facility to send notifications to more than one role.
In addition, standard e-mail notifications are sent when there is a change in owner or approval manager for the service desk record.
· In the Settings panel, click on the '+' sign to expand “Email & SMS Notifications”. Click on “Email Notification Rules” to display the Email Notification Rules configuration page.
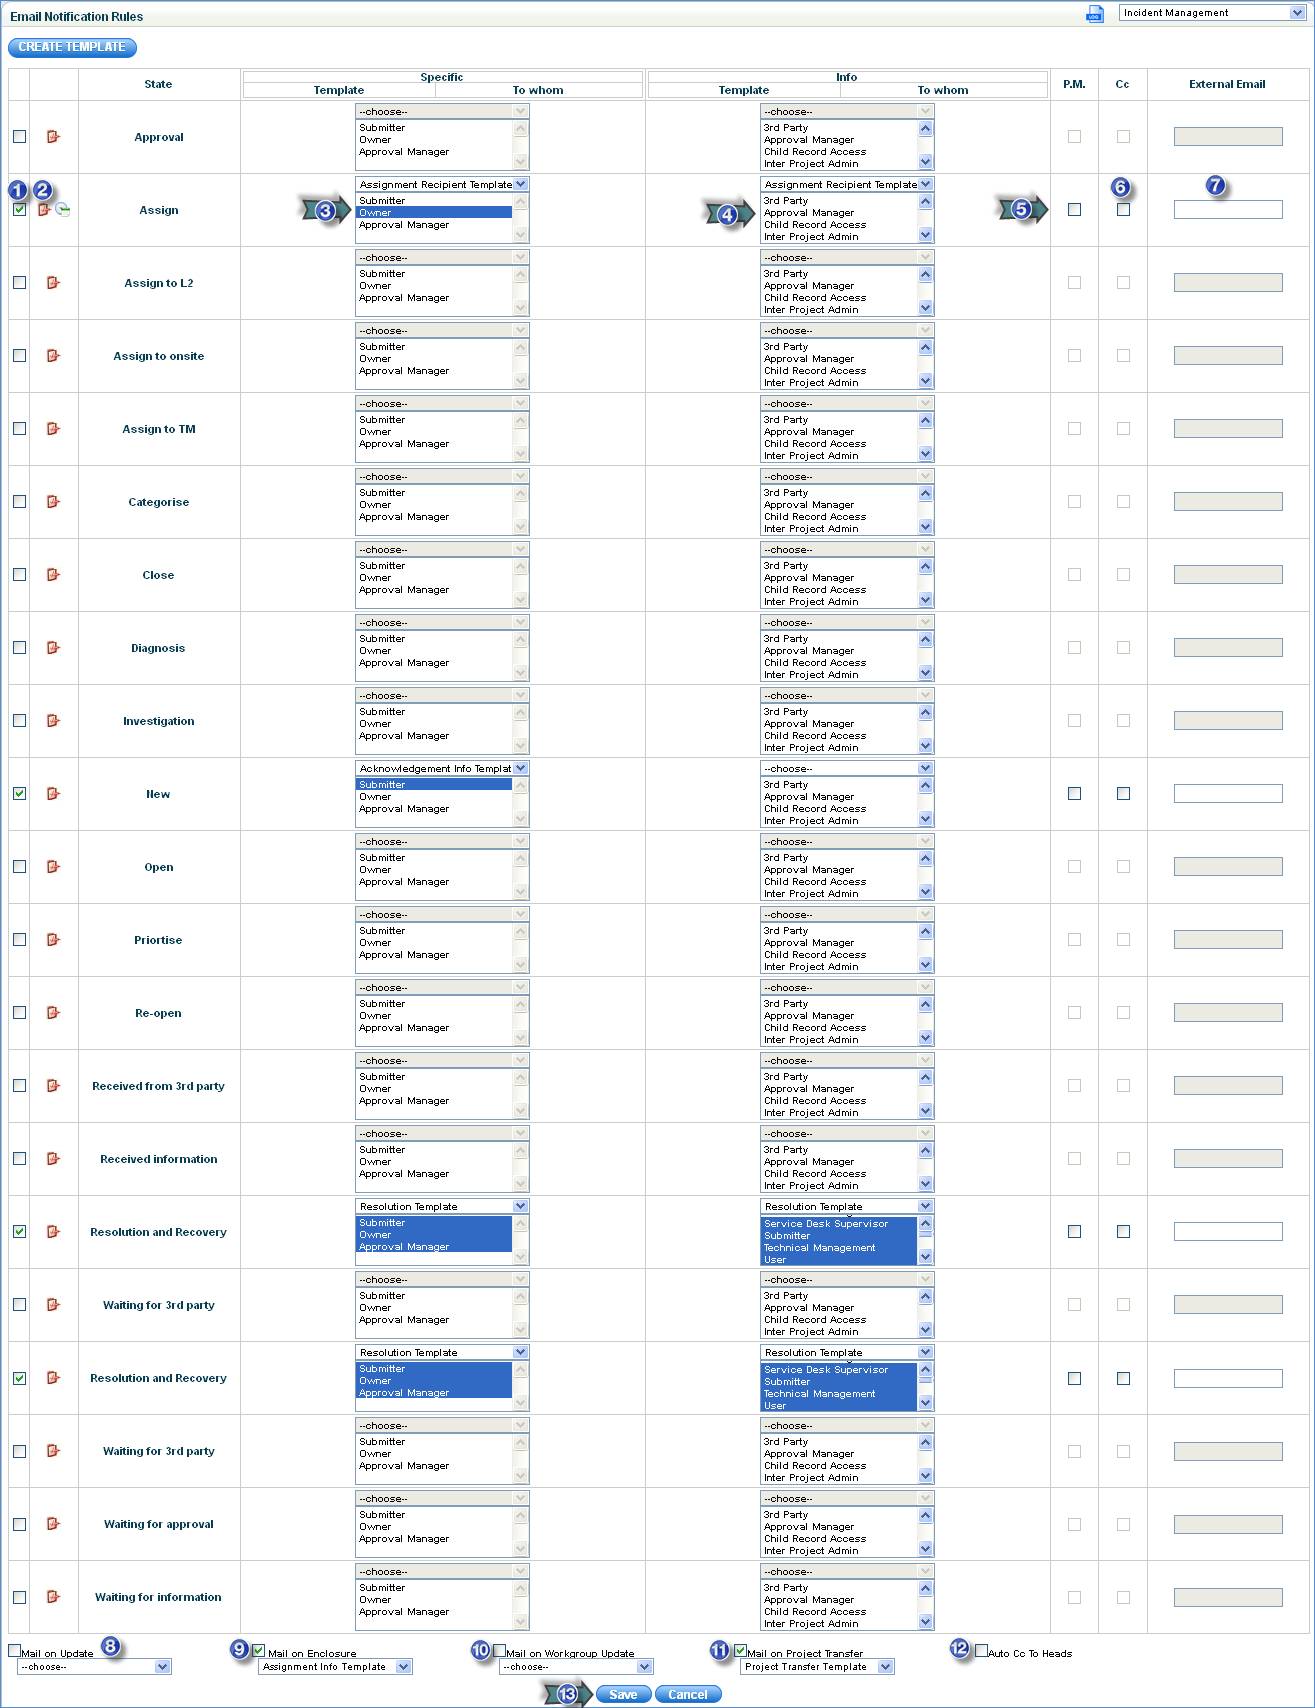
1. Check the state for which the rule has to be defined
2. Custom
Script - The icon '![]() ’ enables the following:
’ enables the following:
Notification –Template - Select a template which will be used for the notification purpose
Action Script - Enter the class name mentioned in the below Custom Script section
Properties - Enter the property file name mentioned in the below Custom Script section
3. Specific - Select the template and the user roles to whom the notifications have to be sent. In the “Template” drop down box, select the desired notification template. In the “To Whom” drop down box, select the roles to which the notification needs to be sent. All the users attached to the role would get the notification message.
Note: The notification template selected in the “Specific” column can be sent to only one user selected from the drop down box.
4. Info - An information mail can be sent to the selected roles and users attached to that role. In the “Template” drop down box, select the desired notification template. In the “To Whom” drop down box, select the role to which the e-mail has to be sent.
Note: The notification template selected in the “Info” column can be sent to all the users of as many roles selected
5. P.M. - Check this option if notification has to be sent to the project manager
6. C.C - Check this option if a cc mail has to be sent to the cc mail ID specified while submitting a new service desk record
7. External Email - Enter the e-mail ID of any other person who should be notified along with the above-mentioned ID’s
8. Mail on Update – Check this box to send mail on update of the service desk records using the template selected from the drop down
9. Mail on Enclosure – Check this box to send mail if an enclosure is added to the service desk record using the template selected from the drop down box
10. Mail on Workgroup Update - Check this box to send mail when the service desk record is allocated to a Workgroup or when the Workgroup is modified
11. Mail on Project Transfer - Check this box to send mail when a service desk record is transferred from one project to another
12. Auto CC To Heads - Check this box to notify the respective “Approval Manager”
13. Click “Save” to save the notification rule
Note: To
configure business notification during non-business hours when the record
is in "New" state, click on '![]() ' icon, select the notification templates and the business hours and holiday
profiles. If “non business hours” profile is selected, then the e-mail
notification is sent only during non business hours, else the e-mail notifications
are sent during business as well as non business hours.
' icon, select the notification templates and the business hours and holiday
profiles. If “non business hours” profile is selected, then the e-mail
notification is sent only during non business hours, else the e-mail notifications
are sent during business as well as non business hours.
Attachments in E-mail Communication
To send attachments in e-mail communication on the state change of the service desk record, follow the steps below.
1. In the Settings panel, click on the '+' sign to expand “General Settings”. Click on “Project Settings”
2. Enter Setting Value of Enable/Disable record attachments in e-mail communication as 1 to enable and 0 to disable attachments in e-mail communication.
3. Restrict the type of attachments allowed in e-mail by specifying Setting Value of the Type of attachments allowed in e-mail communications
Custom Script
You can customize a notification rule for all the states to use a custom script which further can include any or all of the service desk fields for notification purposes.
Use the class file and the property file mentioned below to perform the scripted action. These files are located in “<InstalledDirectory>\WebManagement\server\default\deploy\Sapphire.war\WEB-INF\classes\sapphire\mailroutingscripts” directory.
Action Script = Class file name: “sapphire.mailroutingscripts.GetCustomEmailAddress”
Properties = Property file name: ‘SDMailNotificationScript.properties’
1. Select the notification template, specify the class name and the property file name as mentioned above.
2. Multiple class files and property files can be specified.
3. Contact the support team to obtain the property file as per your requirement.
Step 7: Add SMS Notification Templates
SapphireIMS service desk provides the feature to create templates for SMS notification. SMS notification can be sent in the same way that e-mail notification is sent with the facility to send notifications to more than one role.
1. Go
to Service desk Settings, click project configuration ![]() icon to
configure SMS rules for the project selected
icon to
configure SMS rules for the project selected
2. In the Settings panel, click '+' to expand "Email & SMS Notifications". Click SMS Notification Templates -> Add
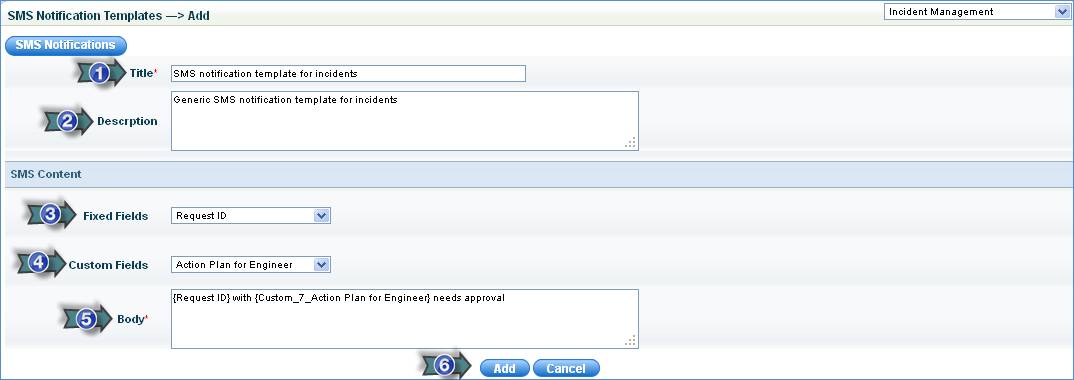
1. Enter the title of the SMS Notification Template
2. Enter the description of the SMS Notification Template
3. Select fixed fields to appear in the template
4. Select custom fields/additional fields to appear in the template
5. Edit the body of the SMS template or SMS content
6. Click “Add”
Step 8: Add SMSNotification Rules
· Click on the '+' sign to expand “Email & SMS Notifications”. Click on “SMS Notification Rules”
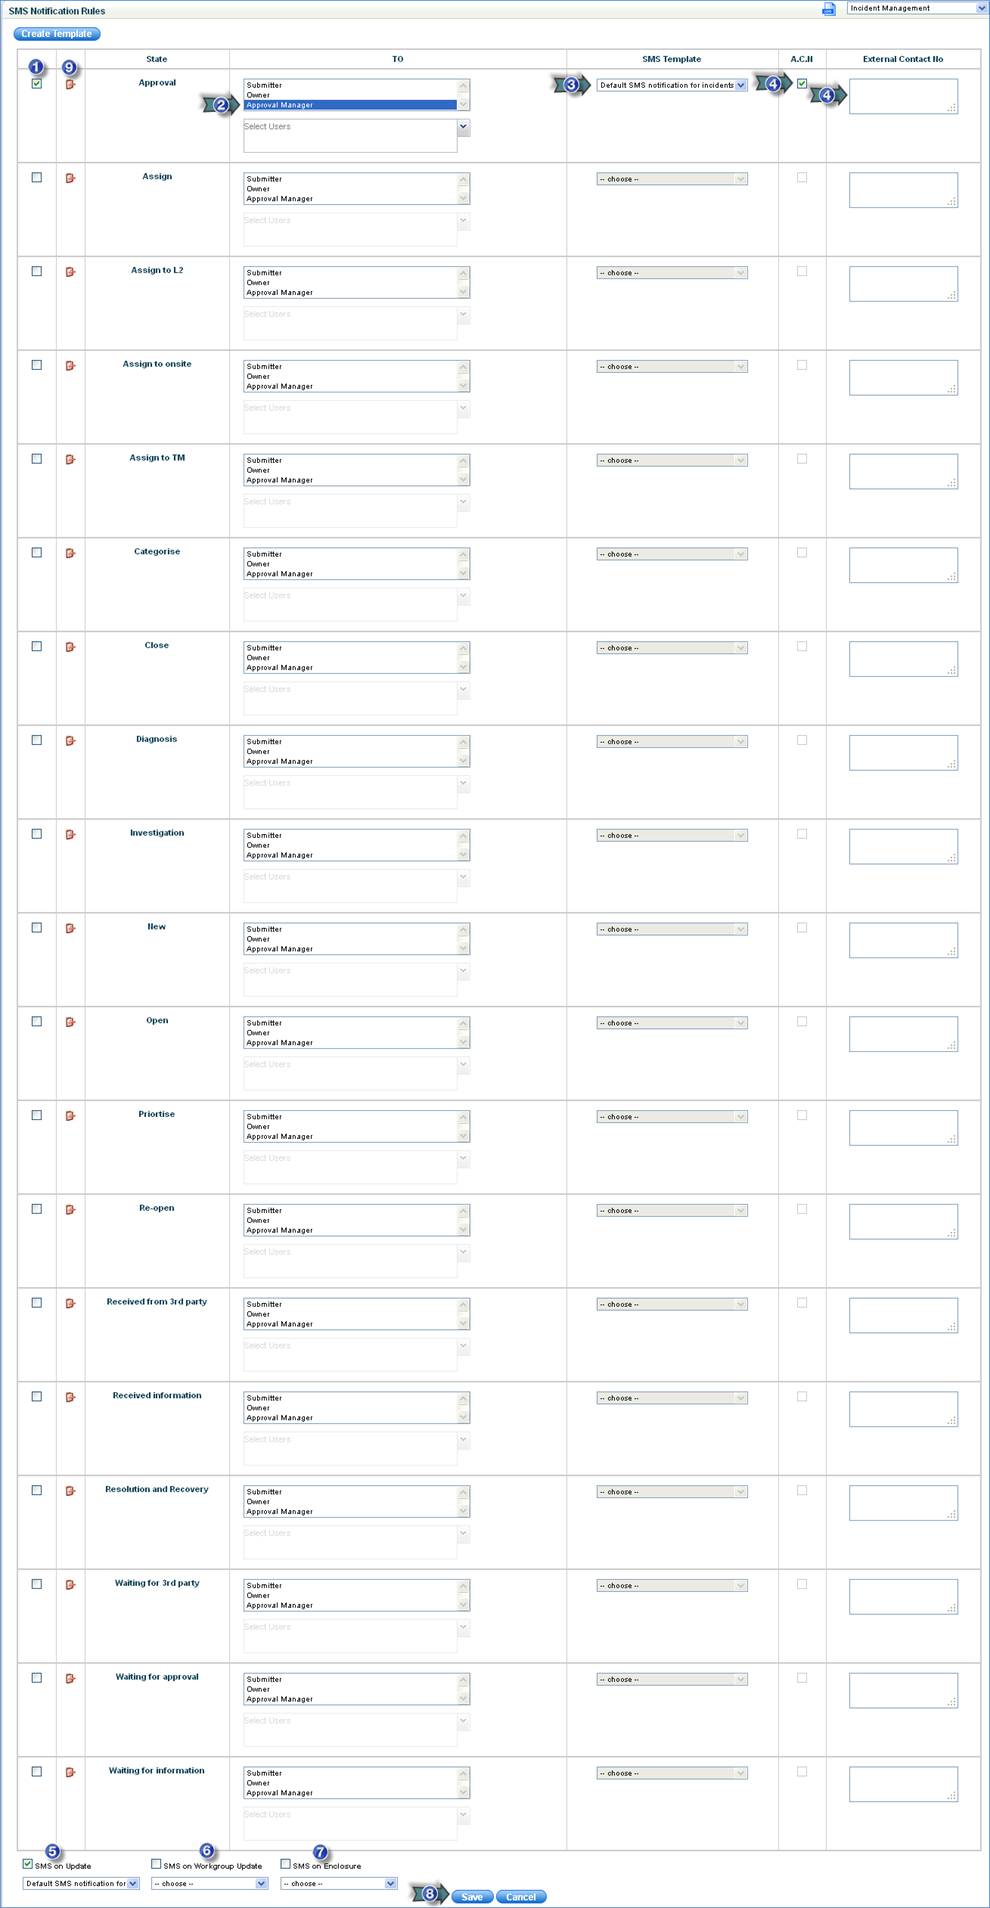
1. Select the state and check the box for which the rule is to be defined
2. Select the role to whom the SMS notification has to be sent
3. Select the SMS template to be sent
4. ACN (Additional Contact Number): Check this box and enter the external contact number
5. If this check box is checked then sms will be sent on update of the of the service desk records using the template selected from the drop down box
6. Check this box to send sms when the service desk record is allocated to a Workgroup or when the Workgroup is modified
7. Check this box to send SMS if any enclosure is added to the service desk record using the template selected from the drop down box
8. Click “Save” to save the SMS notification rule
9. Click
the custom SMS notification configuration ‘![]() ’ icon to
view the custom SMS configuration window
’ icon to
view the custom SMS configuration window
· Select the SMS template and enter the parameters as follows: $Parameter Name for fixed fields and $$Parameter Name for additional fields