![]()
Ver 1.1 Date 14/05/2015
How to Blacklist Software and Block Software Installer
Overview
Software blacklisting feature allows you to blacklist software which are deemed inappropriate within an organization. Blacklisted software can be auto un-installed using software or script packages or a command line un-installation string can be specified. Currently, blacklisting and un-installation of software is not supported in MSP environment.
Step 1: Enable software blacklist feature
· Go to Settings -> IT Automation -> Software Blacklisting. The list of existing software blacklist profiles is displayed.
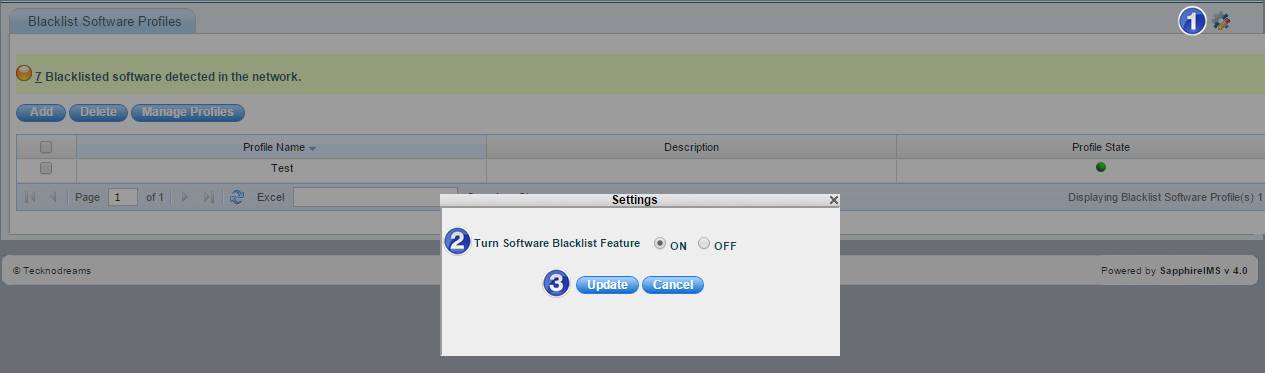
1. Click
on the ![]() Button
Button
2. Click on “ON” to switch on the Software Blacklisting feature. This setting applies to all the profiles that are configured.
3. Click on “Update”
Step 2: Create software blacklist profile
1. Go to Settings -> IT Automation -> Software Blacklisting
2. Click “Add” to create a new software blacklist profile

1. Enter a name for the software blacklist profile
2. Enter description for the same
3. Check the box if the profile has to be enabled
4. Check this box to override Software Blacklisting Policy
5. Enter the time interval in minutes during which software blacklisting policy has to be made obsolete
6. Select "Specific Software Option" to allow specific software installation and enter the name of the software executable that is allowed to run during the selected time interval
7. Click "Add" to add the "Prohibit Software Blacklisting Policy"
8. Select the host inclusion profile from the list or click “Add Host Profile” to add a new inclusion profile
9. Select the host exclusion profile from the list or click “Add Host Profile” to add a new exclusion profile
10. Click this button to define the inclusion or exclusion profile for selecting hosts
11. Enter the profile name for selecting hosts
12. Select the host profile type as “Inclusion System List” or “Exclusion System List”. Select “Inclusion System List” to define the inclusion host profile. Inclusion Profile(s) manage systems based on rule(s)
Select “Exclusion System List” to define the exclusion host profile. Exclusion Profile(s) exclude systems based on rule(s)
13. Select the type or criteria for selecting hosts based on the profile type
14. Enter the start IP for selecting hosts
15. Enter the end IP for selecting hosts
16. Click “Add Range”
17. Click “Add Profile”
18. Click “Save”
Notes: 1. You can select hosts by selecting IP Range, individual IP, node level (host names), domain or organization unit, operating systems or baseline compliant nodes
2. You can also create host profiles under Settings ->Software Management -> Profile Manager -> Select Rule Type drop down value as “Software Blacklist Profile”
Step 3: View Software Blacklist Profile
The software blacklist profile added in Step 2 is displayed in the listing page as follows:

· Click the number '4' to view all the blacklisted software.
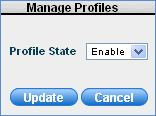
· Select one or more profiles and click the 'Manage Profiles' button to enable or disable a particular software blacklist profile.
Step 4: Normalize software as blacklisted
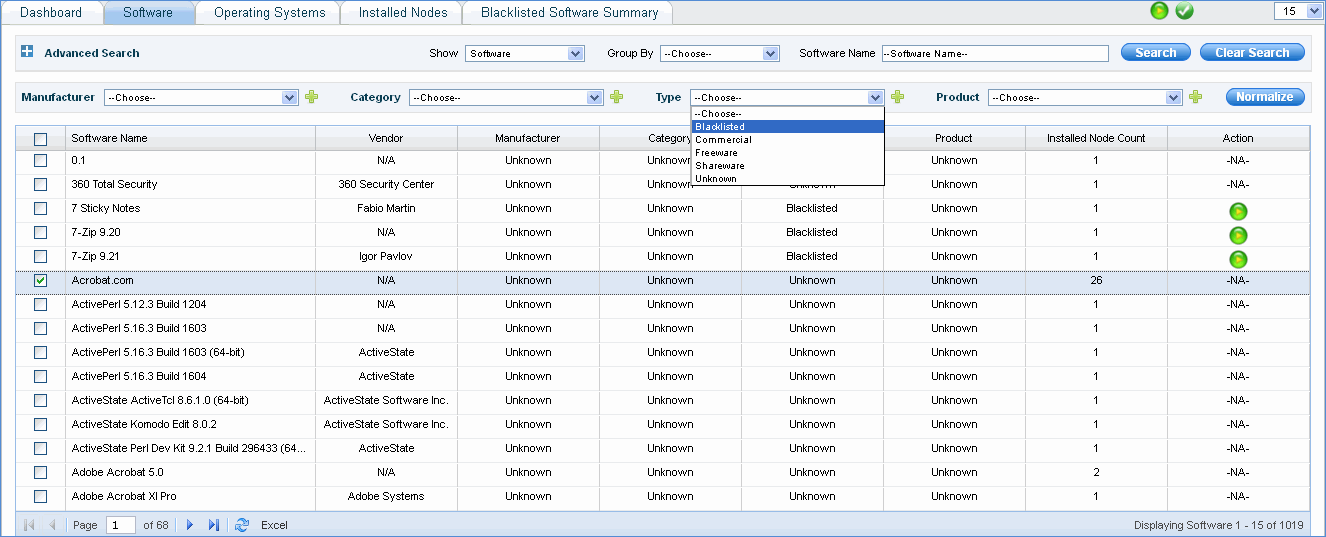
1. On the SapphireIMS menu, point to “Inventory” and click “Installed Software”
2. Click the “Software” tab
3. Check the software to be blacklisted, in the “Type” drop down box, select “Blacklisted” and click the “Normalize” button to move the software to the blacklisted category.
Notes:
1. Once a software is blacklisted, it will be listed under Inventory menu
-> Installed Software -> Software tab with the '![]() '
icon only if the software blacklist feature is enabled for the defined
profiles
'
icon only if the software blacklist feature is enabled for the defined
profiles
2. Similarly, you can re-normalize or move the blacklisted software to any other type
3. In case the software is not listed in the “Software” tab, please perform a “Get Inventory” action in the “Discovery” listing page. Refer to guide http://www.sapphireims.com/howtoguides/ How to discover network devices -> View Inventory Data of a specific device -> Actions - Get Inventory Data
Step 5: Select package for auto uninstall of blacklisted software OR enter command line for auto uninstall of blacklisted software
For any uninstallation,
you can select the in-built script packages or provide a custom uninstallation
string (also called as silent uninstallation as there is no user input).
Click the '![]() ' to select the uninstallation
package or specify an uninstallation string for the respective blacklisted
software to be removed from the network.
' to select the uninstallation
package or specify an uninstallation string for the respective blacklisted
software to be removed from the network.
· Go to Inventory Tab-> Installed Software

1. Click on “Blacklisted” Type which will open the page as shown below
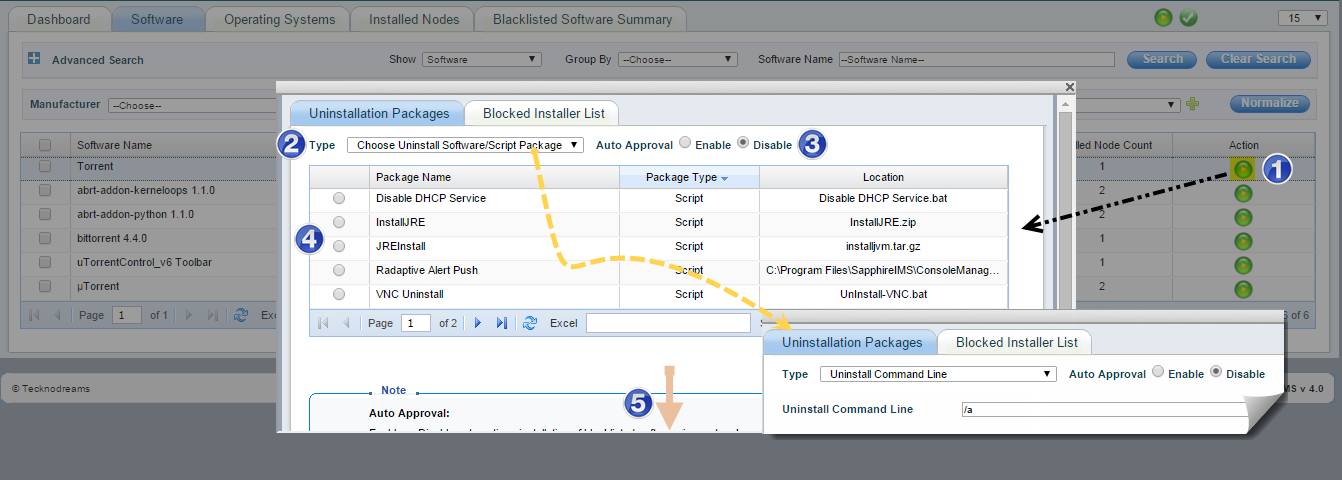
1. Click
on the ![]() Button for a Backlisted
Software which you would like to Uninstall Automatically. In the Popup
Window go to “Uninstallation Packages Tab” Tab
Button for a Backlisted
Software which you would like to Uninstall Automatically. In the Popup
Window go to “Uninstallation Packages Tab” Tab
2. In the “Type” menu select “Choose Uninstall Software/Script Package” to uninstall the Blacklisted Software using an Uninstall Software/Script Package
OR
Select “Uninstall Command Line” to uninstall the Blacklisted Software using a Command Line
3. Select “Enable” or “Disable” to Enable/Disable Auto Uninstallation of the Blacklisted Software
4. Select a Software Uninstallation Package/Script Package or Enter the Uninstall Command Line using which the Blacklisted Software will be uninstalled
5. Click on “Save”
Notes: 1. If the installation and uninstallation exe names are the same, then the uninstallation will not happen as the exe will be blocked by the software blacklisting feature
2. Already blacklisted software can be uninstalled only after removing the blocking and allowing the process to run
Step 6: View Uninstallation job details
1. On the SapphireIMS menu, point to “Inventory” and click “Installed Software”
2. Click the “Blacklisted Software Summary” tab

· The hosts for which the software is blacklisted are listed. Click the blacklisted software to view the details as shown below:
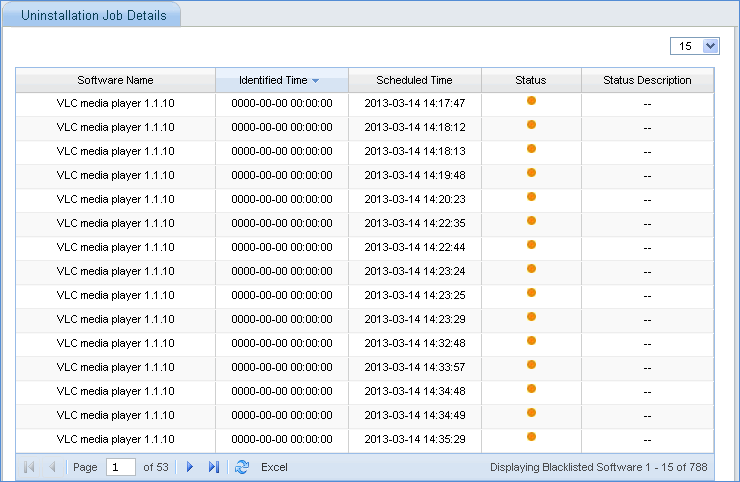
· Once the software is blacklisted, an alarm is generated. To view the alarm job status, point to “Fault” menu and click Alarms -> Alarm Job Status

Step 7: Block Software Installer
This feature allows you to block the software installer (exe as well as msi) for the blacklisted software.
1. On the SapphireIMS menu, point to “Inventory” and click “Installed Software”
2. Click the “Software” tab
3. Search for blacklisted software
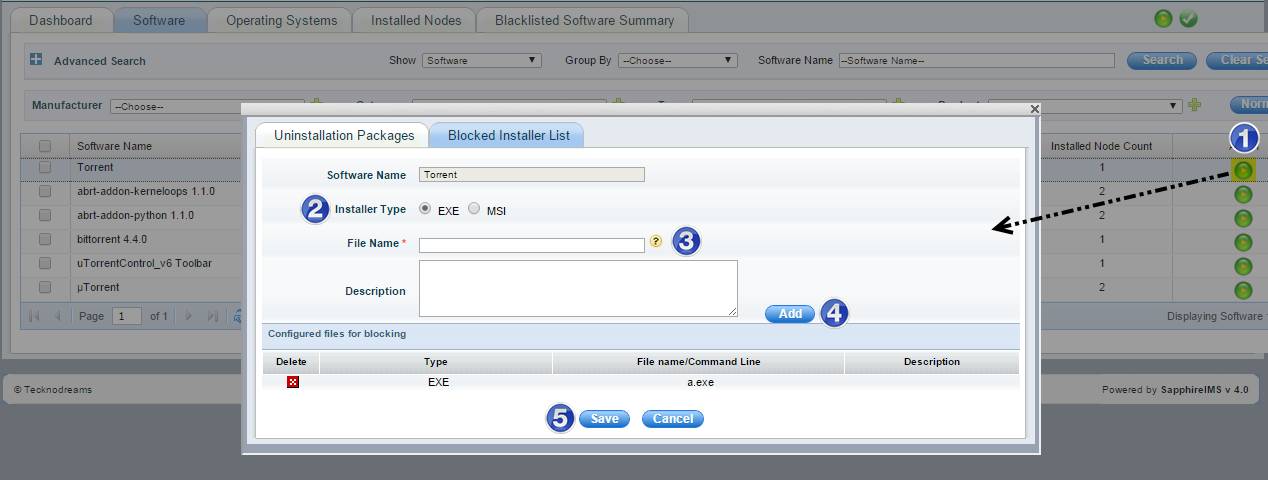
1. Click
on the ![]() Button for a Backlisted
Software which you would like to Block Usage or Block Installation. In
the Popup Window go to “Blocked Installer List” Tab
Button for a Backlisted
Software which you would like to Block Usage or Block Installation. In
the Popup Window go to “Blocked Installer List” Tab
2. Select the Installer Type as EXE or MSI depending on the Software Type
3. Type the “File Name” for “EXE” or “Command Line” for “MSI” to block execution
4. Click on “Add”
5. Click on “Save”
Note: All exe or process names of the software that need to be blacklisted have to be provided in the configuration so that the software can be successfully blocked.
Any change in exe names due to version difference has to be taken care of.
· Once the job of blocking the software installer is completed by the agent, it will be listed under the Inventory menu > Installed software > Blacklisted Software Summary
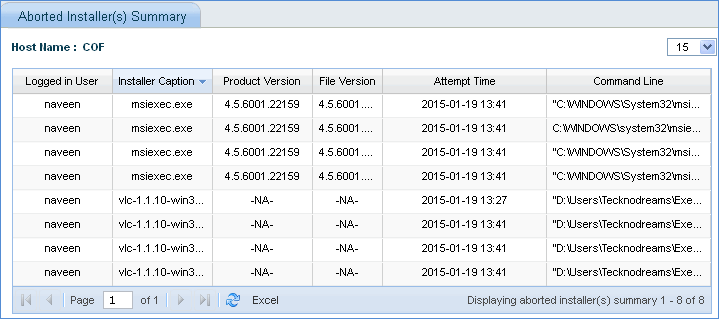
· Select the “Aborted Installers” option button to view the list of aborted installers

· Click on the number of “Aborted Installer(s) Summary” to view the aborted installer details for the host