![]()
Ver 1.0 Date 28/11/2014
How to Configure Approval Process
Overview
The approval process is integrated into the workflow of the service desk project. Request Fulfillment and Incident Management offer Multi- Level Approval process through creation of a multi-level approval state comprising of a multi step process to make sure that every request is worked on only after a proper approval. The approval process supports both Single and Multiple Approvals for both Sequential as well as Parallel approvals. The multi-level approval state allows multiple approval managers to approve a service desk record. You can specify the number of approval levels and the minimum approval number required for the service request to continue the configured workflow. The multi level approval process can be customized for mainly two types of approvals:
Parallel Approval - In parallel approval process, a service request can be sent for approval at the same time to multiple approval managers
Sequential Approval - In sequential approval, the service request is sent for approval in sequential order
Step 1: Edit States Configuration
Launch Service Desk application
Go
to Settings and click the Project Configuration icon ‘![]() ’ of
the service desk project for which the approval process has to be
configured
’ of
the service desk project for which the approval process has to be
configured
In the Settings panel, click States
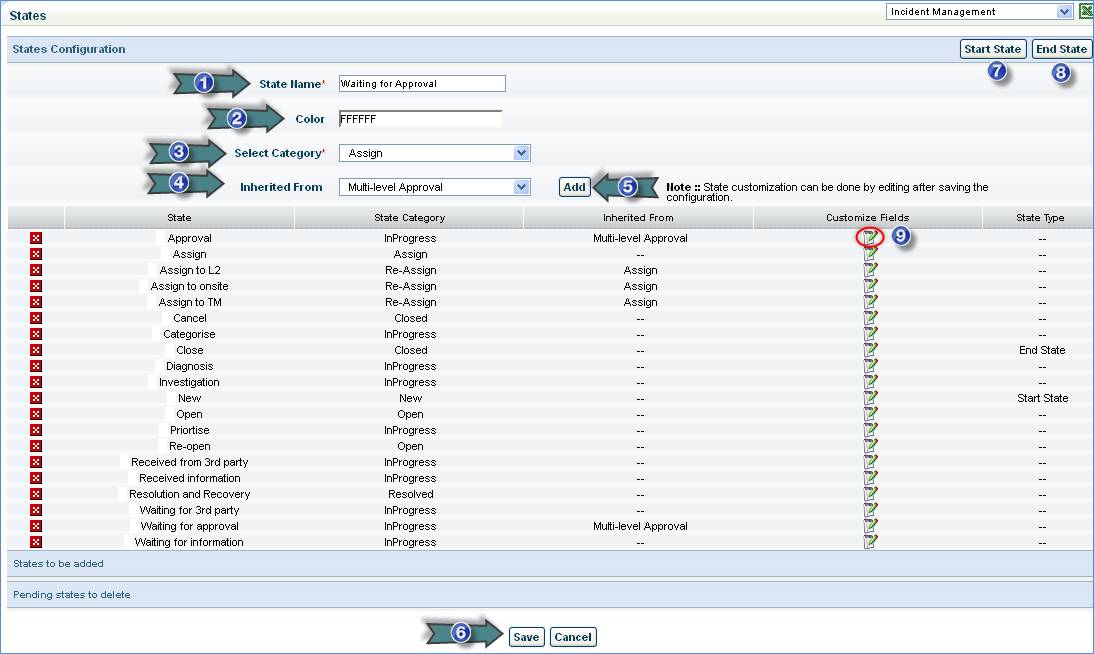
1. Enter the name of the state
2. Select the color code associated with the state
3. Select the category associated with the state
4. If required, the new state can be inherited from one of the existing states present in “Inherited From” drop down box. To configure multi-level approval for a state, select “Multi-level Approval” from the drop down.
5. Click “Add”
6. Click “Save” to save the new state
7. Click “Start State” if you want to select the start state. This is the state that is considered as the start state of the service desk request.
8. Click “End State” if you want to select the end state. This is the state that is considered as the end state of the service desk request.
9. Click this icon to customize multi-level approval state
Step 2: Customize multi-level approval state
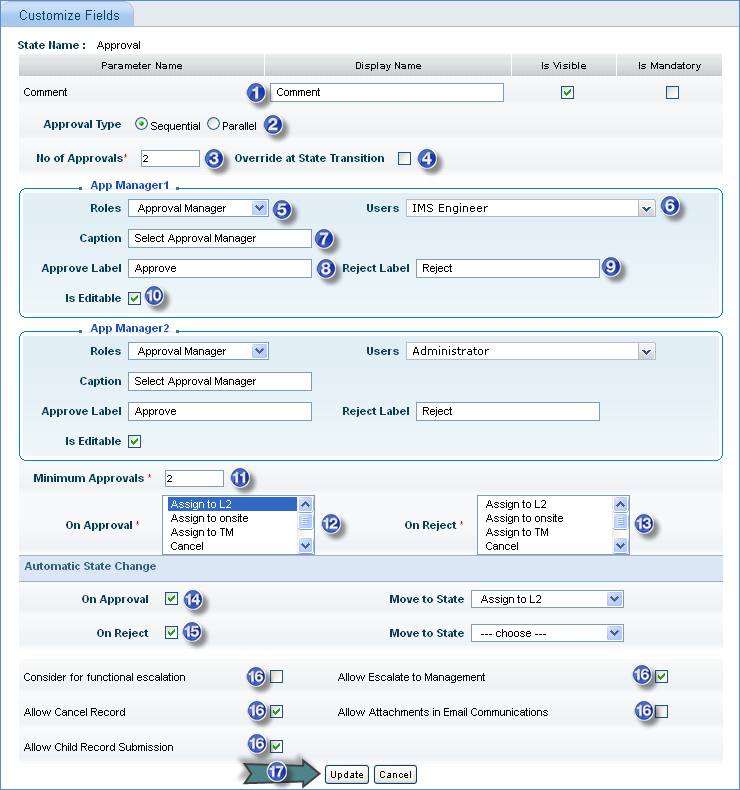
1. Enter the comments for multi level approval action. Check the box for visibility of comments and check the box ‘Is Mandatory’ to make the comment text box a mandatory field.
2. Select the type of approval
3. Enter the number of approval levels that a service record has to pass
4. Select this box if you want to over write the number of approval levels mentioned in the previous step. This option allows modifying the number of approvals and the approval manager at the time of record state change
Approval Manager 1: Select the first approval manager details
5. Select the role of the approval manager
6. Correspondingly, the user drop down is populated. Select the user.
7. Enter the caption of the approval manager
8. Enter the Approve label. It will be displayed in the “Approval Info” section of the record
9. Enter the Reject label. It will be displayed in the “Approval Info” section of the record
10. Select this box if you need to edit the approval manager while modifying the record state
Similarly, fill in the details of the other approval managers whose approval is required
11. Specify a numeric value. This suggests that the service desk record needs to be approved number of times specified here to follow the configured workflow. The service desk record will follow the configured workflow only if the record reaches the minimum number of approvals.
12. Select one or multiple states. On approval, the record is moved to the selected state.
13. Select one or multiple states. When rejected, the record is moved to the selected state.
14. Check “On Approval” box and select the state to which the service desk record has to be moved automatically
15. Check “On Reject” box and select the state to which the service desk record has to be moved automatically
16. Check the boxes that are applicable for this state
17. Click “Update” to save the multi-level approval configuration
Step 3: Allocate Approval Manager
Delivery of critical services may need special approval from the authorities. In order to facilitate this process, SapphireIMS Service Desk has pre-defined states called ‘Waiting for Approval’, ‘Approved’ and ‘Rejected’
Configuring of approval mechanism is a two-stage activity.
1. Identify the Users / Authorities who have the right to perform the approval. Upon identification, allocate 'Approval Manager' role to the user.
· Go
to Project Settings, and click the ' ![]() '
icon of the respective project
'
icon of the respective project
· In the Settings panel, click “Users”
· Select the role as “Approval Manager” and click “Allocate Users”
· Select the users to be allocated with this role and click “Save”
Step 4: Change State to “Waiting For Approval” for single approval
If the service desk user has the permission, he can move the service desk records, which require approval into “Waiting for Approval” state using “Change State” option in record details page.
1. Click “Service Request” > “My Requests” tab or “Service Request” >”All Requests” tab and select the request or search for the request.
2. While viewing the request, select “Waiting for Approval” in the “Change State” drop down to display a “Change State” window.
3. Select the Approval Manager and click “Change”
4. A confirmation message will be displayed after successful assignment of service request to the selected approval manager.

Step 4: Change State to “Waiting For Approval” for multiple approval
The following section shows how a request is placed for Multiple Approval.
1. Click “Service Request” > “My Requests” tab or “Service Request” >”All Requests” tab and select the request or search for the request.
2. While viewing the request, select “Waiting for Approval” in the “Change State” drop down to display a “Change State” window. If the Multiple Approval state is configured with a different name, select the appropriate state.
3. Select all the Approval Managers and click “Change”.
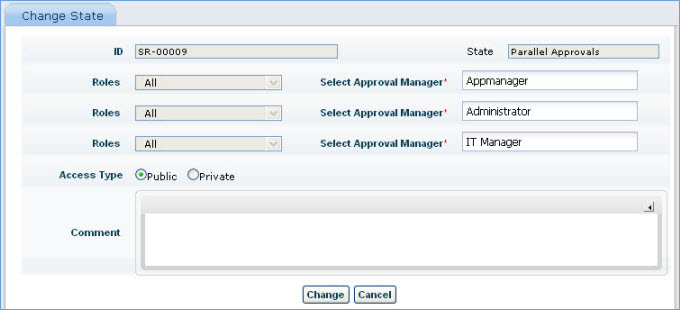
4. A confirmation message will be displayed after successful assignment of service request to the selected approval manager.
Step 5: Single Level Approval
You must be an approval manager to approve or reject the service request. If the request is rejected it must be closed and resubmitted after modification.
The following section lists down the steps to approve the service request.
1. Click “Service Request” > “My Requests” tab or “Service Request” >”All Requests” tab and select the request or search for the request.
2. While viewing the request, select “Approved” in the “Change State” drop down to display a “Change State” window.
3. Type the comments and click “Change”.
4. The request is now successfully approved.
Step 6: Multi Level Approval
This section is applicable for service requests that are in multi-level approval state. An approval manager can approve or reject the request by the click of an icon.
To approve/reject a request, follow the steps mentioned below.
1. Click “Service Request” > “My Requests” tab or “Service Request” >”All Requests” tab and select the request or search for the request.
2. Scroll down to the section of 'Approval Info'.
3. To change
the approval manager, click![]() icon. Select
the approval manager from the drop down and click 'Update'
icon. Select
the approval manager from the drop down and click 'Update'
4. To approve,
click ![]() icon.
'Change Approval Status' window will be displayed. Type the comment and
click 'Save'
icon.
'Change Approval Status' window will be displayed. Type the comment and
click 'Save'
5. To reject,
click ![]() icon.
'Change Approval Status' window will be displayed. Type the comment and
click 'Save'
icon.
'Change Approval Status' window will be displayed. Type the comment and
click 'Save'
6. If any further clarification is required
click ![]() icon.
'Send Mail' window will be displayed. Type the details and click 'Send'
icon.
'Send Mail' window will be displayed. Type the details and click 'Send'

Post Action Support for Multi Level Approval
You can configure a custom business rule to automatically change the state of the request for multi level approval. For more information on configuring custom business rules, refer Custom Business Rules
· Go to Project Settings > Custom Business Rules
· Select “Action Type” as “Post Action”
· Select “Class Name” as “AutoRequestTransition”
· Select 'Property File Name' as “AutoRequestTransition.properties” and save the business rule
· Open the property file “AutoRequestTransition.properties” and make the following changes:
1. Remove # before Action property (Action = Waiting for Approval)
2. Provide the state name for MoveToState property (MoveToState=<State Name>; state to be moved to after executing post action rule)
Note: If there are multiple number of approvals configured, approval managers should be specified for every approval irrespective of the minimum number of approvals.
Step 7: Email Approval
Service desk records submitted that require the approval of the approval manager can be approved through e-mail by the approval manager.
To facilitate e-mail approval, follow the steps listed below:
1. Configure the POP3 or IMAP Server with the polling e-mail ID as explained in Email to Record Configuration. All e-mails will be sent to this ID.
2. Provide the 'Setting Value' of the global settings key 'Email based approval (url/mailto)' as 1
3. Specify the macro MACRO_STATE_CHANGE_OPERATIONS anywhere in the body text of the Notification template as shown in the below image. See Appendix for the list of macros supported in SapphireIMS
Note: The e-mail will be sent to the approval manager only if the approval manager is selected in the Notification Rules settings “To whom” drop down of the “Specific users” column as shown below.
4. Please provide the short names for approval/rejection of the request through e-mail in the 'ShortName' column in sd_statesmaster table for the corresponding service desk project.
Some examples of short names:
· Approved by IT Head - AppITH
· Rejected by IT Head - RejITH
Once the e-mail notification settings are configured, the approval manager of the ticket will receive an e-mail similar to the image shown below.
5. To approve the request through e-mail, the approval manager has to click the state to which the request has to be moved as highlighted in the above image and specify the short name (for approval or rejection) in square brackets [] at the end of the subject line as shown below.