![]()
Ver 1.1 Date: 10/2/2015
How to Configure Windows Patch Management
Overview
Patch Management module helps to scan and assess the patches that are deployed / missing in the Windows devices in the network. This helps you to make sure that all the critical patches released by Microsoft are up to date on the network and there are no security vulnerabilities in the network. The following sections provide details of scanning the network for the missing patches as well as deploying the same.
Step 1: Configure Patch Management General Settings
· Go to Settings Tab-> Software Management-> Patch Management Settings
· Click Windows Patch Management Settings
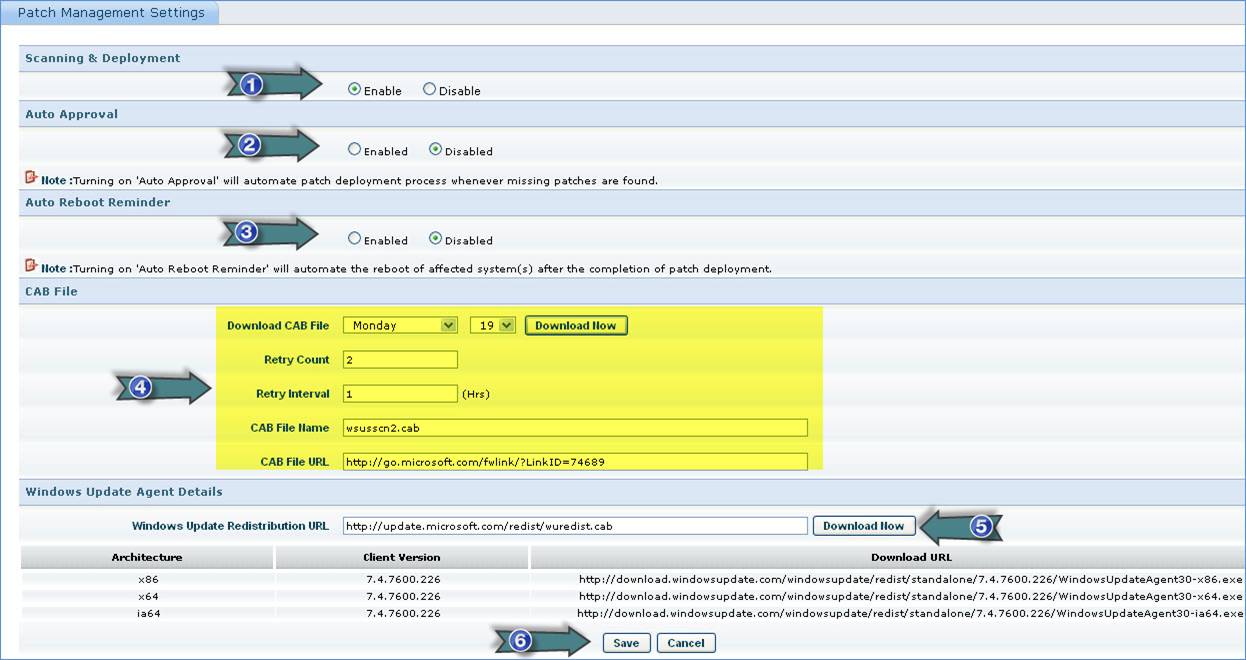
1. Enable “Patch Scanning and Deployment”
2. Enable or disable “Auto Patch Approval” based on your IT Policy
3. Enable “Automatic Patch Reboot Reminder”
4. Define the settings to download the Microsoft Offline Patch Scan file “WSUSSCN2.cab” This file is used to scan the Windows PC to find the list of missing patches
5. Define the URL to download the “Windows Update Redistribution” file
6. Click “Save”
Follow the instructions given in the above screenshot to configure the Patch Management General Settings
Step 2: Create Patch Management Profile
· Go to Settings Tab-> Software Management-> Profile Manager. From the “Rule Type” dropdown list select a Patch Management Profile type and click on “Add” to add the selected type of profile
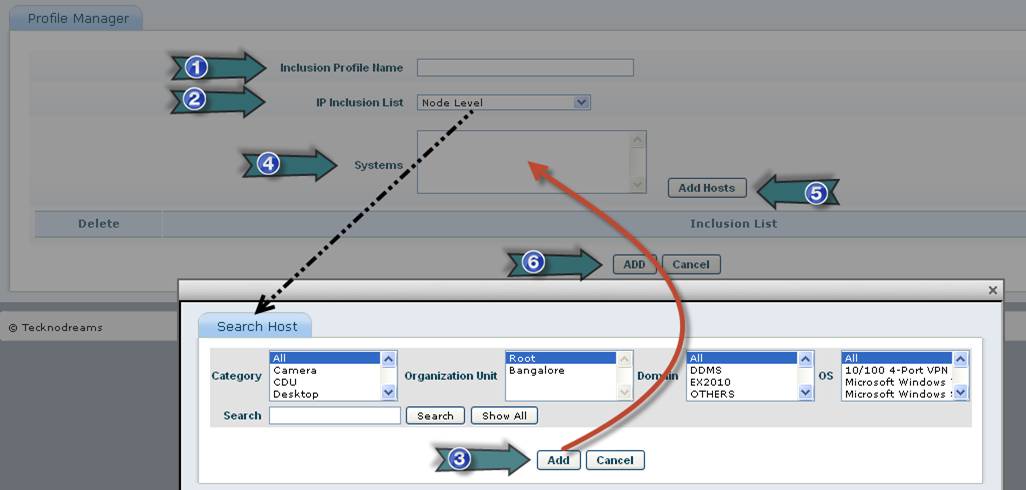
1. Type the Profile Name
2. Select the Node Filter Type
3. Select the nodes and click “Add”
4. Selected nodes will be listed here
5. Click "Add Hosts" to add hosts to the profile
6. Click on “Add” to create the profile
There are three types of Patch Management Profiles
Sl. No. |
Profile Type |
Description |
1 |
Patch Inclusion List |
This Profile is used to create a list of systems which will be considered for Patch Management |
2 |
Patch Exclusion List |
This Profile is used to create a list of systems which will not be considered for Patch Management |
3 |
Critical System List |
This Profile is used to create a list of systems which will be designated as Critical Systems considered for Patch Management. For these Critical Systems Automated Scheduled Patch Deployment will be prevented. For these Critical Systems Patch can deployed only on-demand |
Follow the instructions given in the above screenshot to add the Patch Management Profile. Once a profile is created it will be listed in the “Profile Manager” page
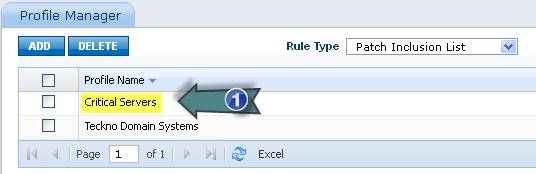
1. Click here to edit the Patch Management Profile settings
To delete a profile, select a profile and click on “DELETE”. To edit the settings of a Patch Management Profile click on the profile name. Select a profile type from the “Rule Type” dropdown list to view the list of Patch Management Profiles for that type
Step 3: Create Patch Management Rule
· Go to Settings Tab-> Software Management-> Patch Management Wizard.
· Click “Windows Patch Management Wizard”. Click “Add”

1. Select the Patch Inclusion List Profiles
2. Click “Add New Profile” to add new “Patch Inclusion List Profile”
3. Click “Next”
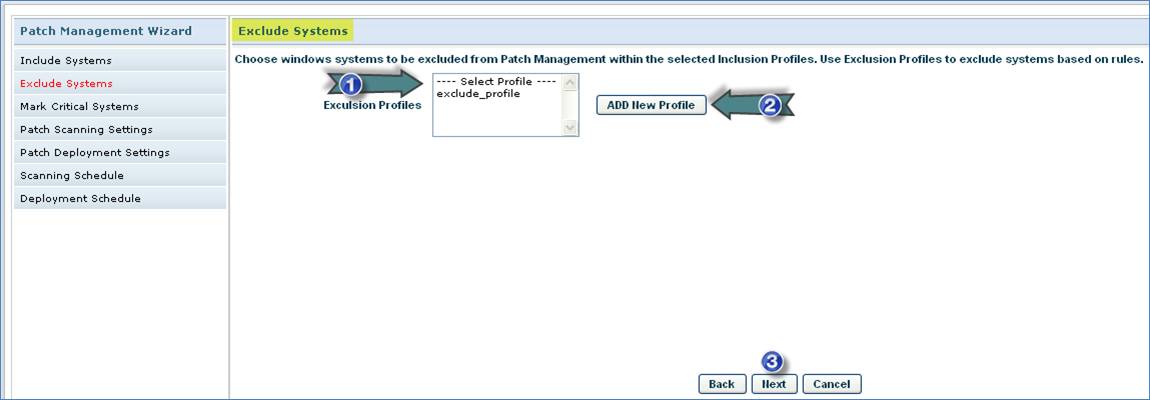
1. Select the Patch Exclusion List Profiles
2. Click “Add New Profile” to add new “Patch Exclusion List Profile”
3. Click “Next”
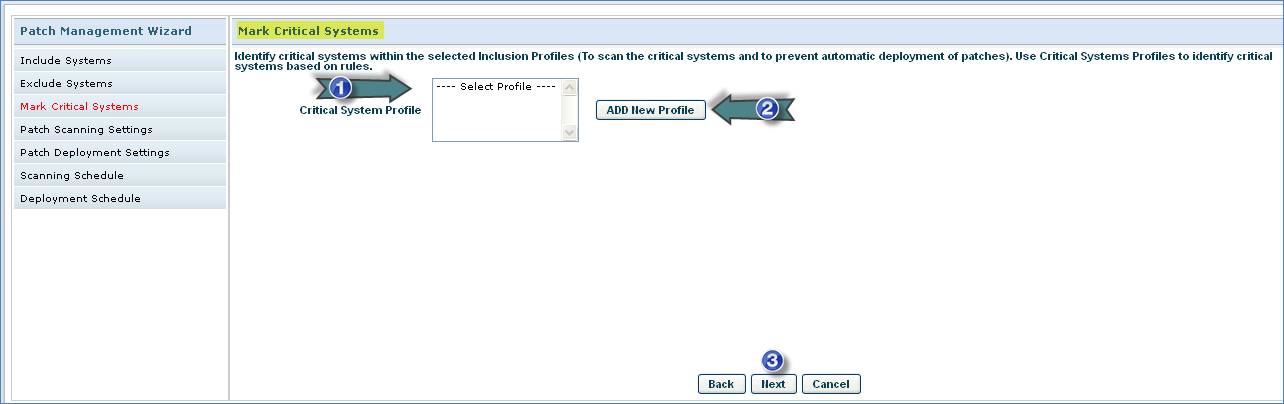
1. Select the Critical System List Profiles
2. Click “Add New Profile” to add new “Critical System List Profile”
3. Click “Next”
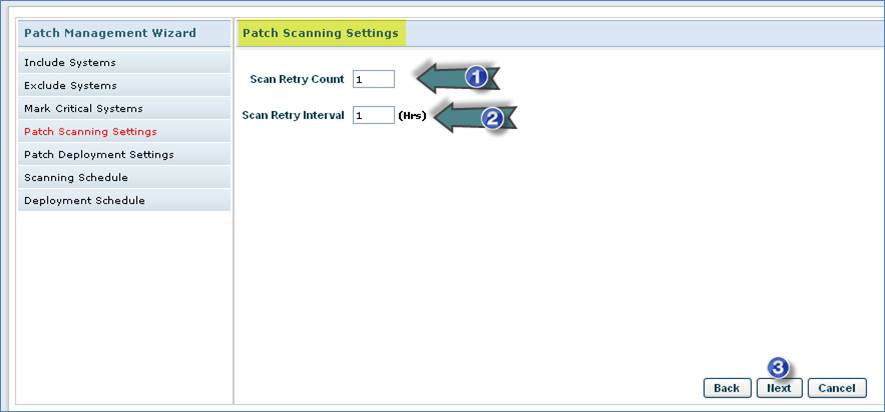
1. Enter the “Scan Retry Count” to retry patch scan on failure
2. Enter the “Scan Retry Interval” in hours
3. Click “Next”
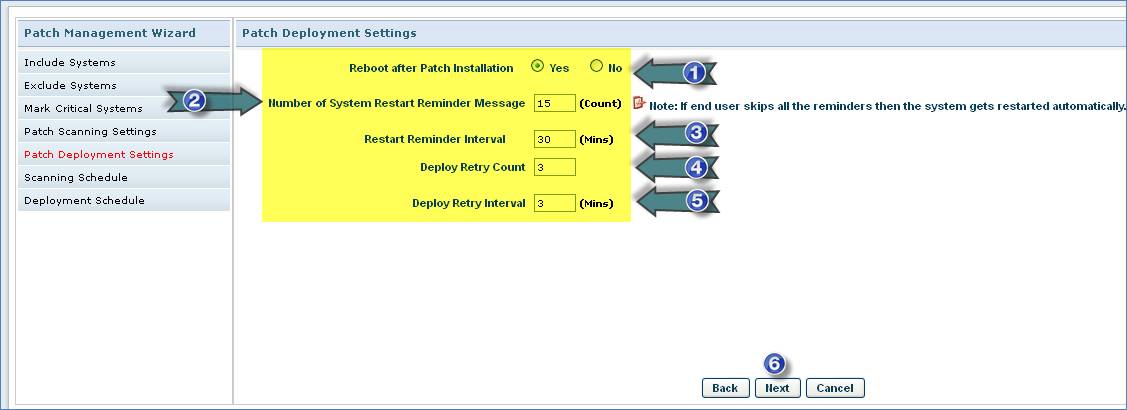
1. Select Reboot option
2. Enter the No. of “System Restart Reminder Messages” to send to the end user
3. Enter the Time Interval in minutes for sending repetitive Restart Reminder Messages
4. Enter the “Deployment Retry Count” to retry patch deployment on failure
5. Enter the “Deploy Retry Interval” in minutes
6. Click “Next”
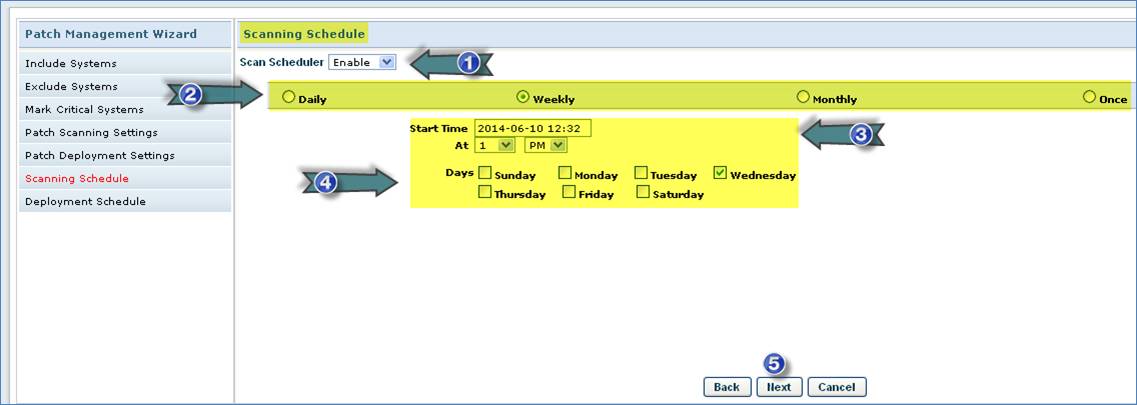
1. Enable Patch Scan Scheduler
2. Select Schedule Interval
3. Select Schedule Date and Time
4. Select Days or Months
5. Click “Next”
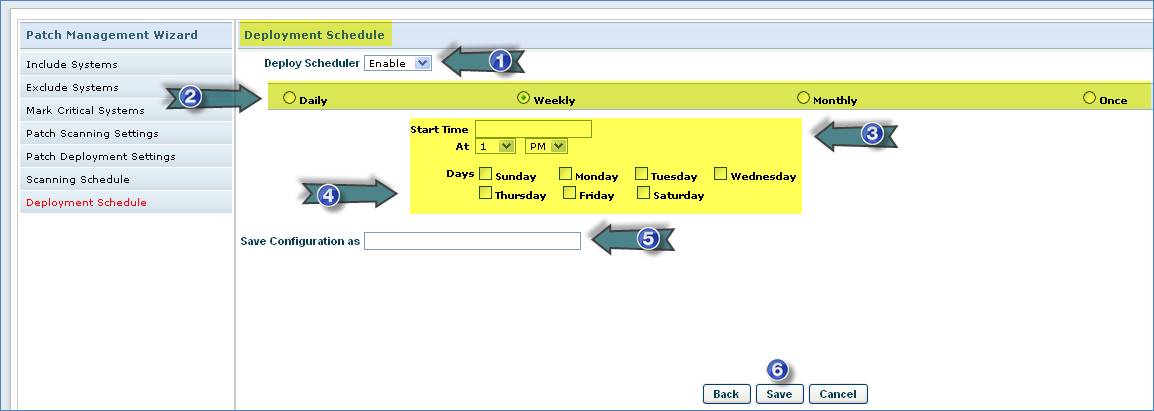
1. Enable Patch Deploy Scheduler
2. Select Patch Deploy Schedule Interval
3. Select Schedule Date and Time
4. Select Days or Months
5. Type the Rule Name
6. Click “Save”
Follow the instructions given in the above screenshot to add the Patch Management Rule. Once a rule is created it will be listed in the “Windows Patch Management Wizard” page
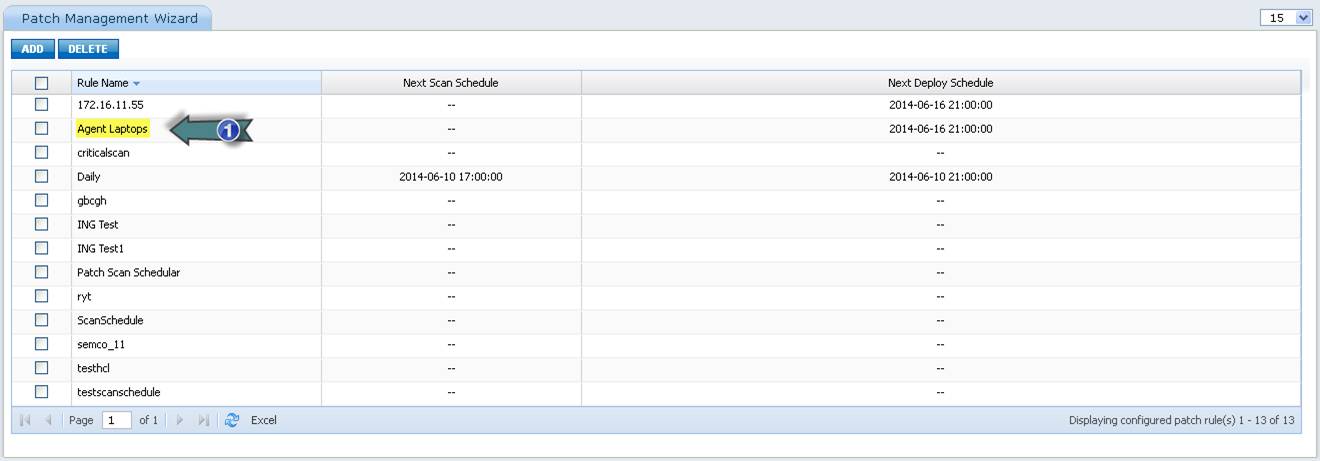
1. Click here to edit the Patch Management Rule settings
To delete a rule, select a rule and click on “DELETE”. To edit the settings of a Patch Management Rule click on the rule name
Step 4: Track Patch Management Status
View Patch Management Dashboard
· Go to IT Automation Tab-> Patch Management
· Click “Dashboard” tab
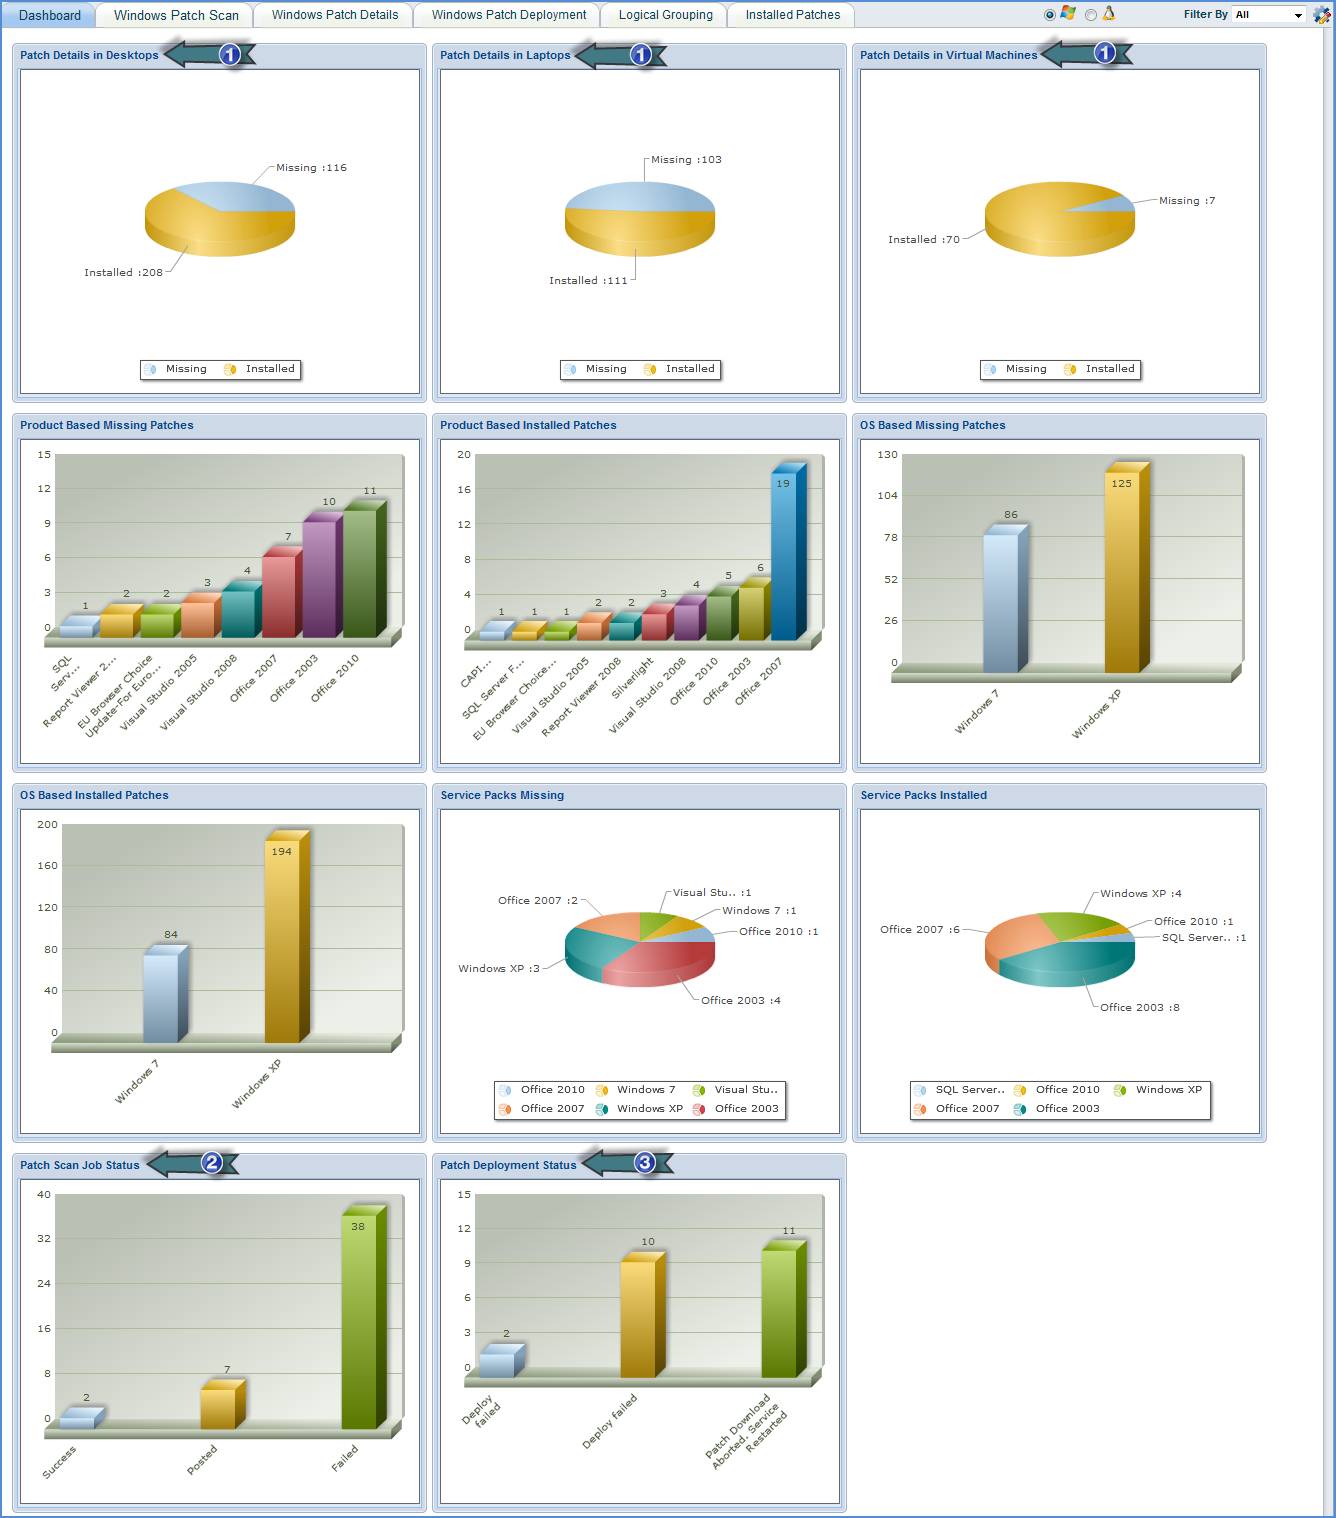
1. Track the status of missing and installed patches in desktops, laptops and virtual machines
2. Track the status of patch scan jobs
3. Track the status of patch deployment jobs
View Patch Scan Details
· Go
to IT Automation Tab-> Patch Management. Select the "Windows Patches"
![]() option.
option.
· Click "Windows Patch Scan" tab to view the results of patch scan.

1. Select
the "Windows Patches" ![]() option.
option.
2. Select the systems and click on “SCAN” to start Patch Scan immediately
3. Filter systems by All, Normal Systems or Critical Systems
4. Filter systems based on Operating System
5. Filter systems based on Host Name, Logical Group Name or Organization Unit
6. Type a value based on the “Search Filter Type” selection and click “Go”. To clear the search filter, click on “Clear Search”
7. Click on the count to show all the missing patches for a system
8. Click on the count to show all the missing service packs for a system
9. Click this icon to refresh the page
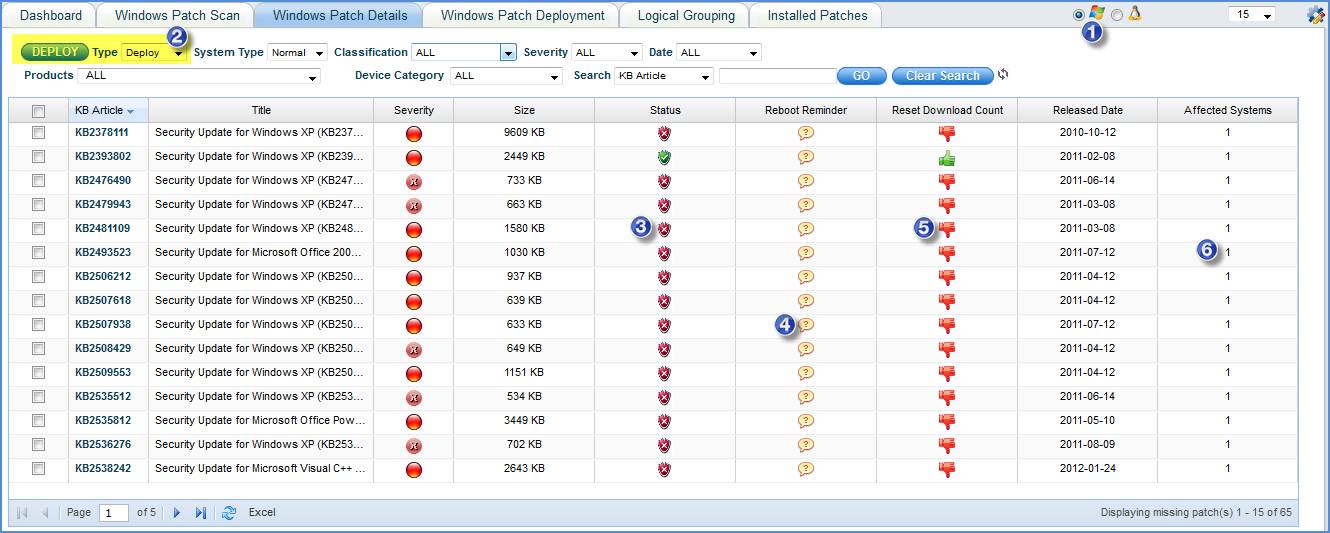
View Patch Details
· Go
to IT Automation Tab-> Patch Management. Select the "Windows Patches"
![]() option.
option.
· Click "Windows Patch Details" tab.
List of Patches which are Waiting for Approval
1. Select
the "Windows Patches" ![]() option.
option.
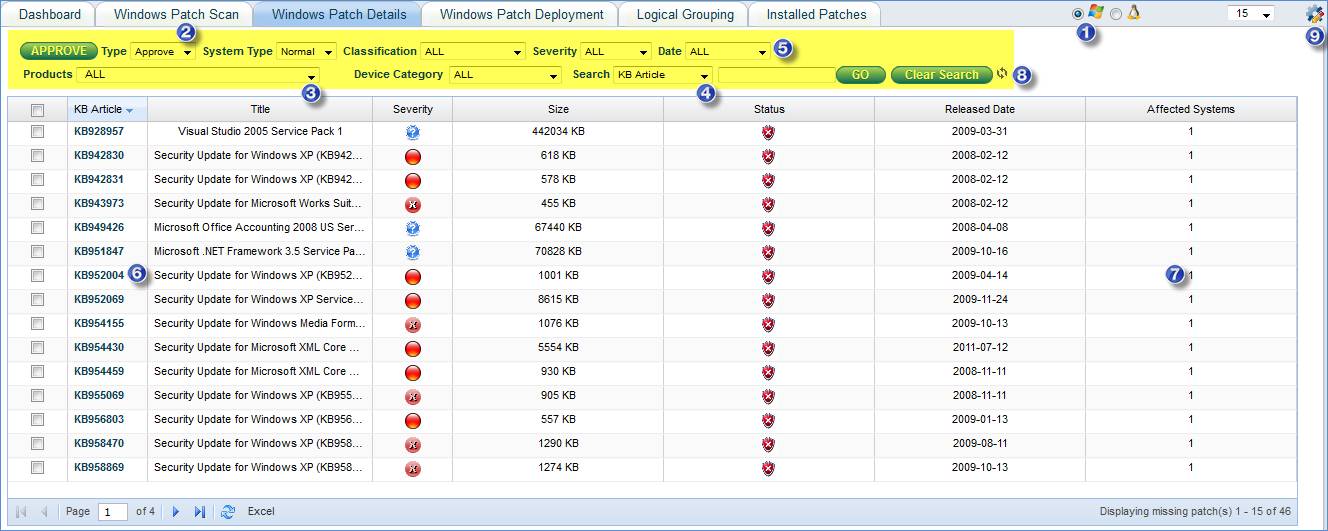
2. Manual Patch Approval: Select “Type” as “Approve”-> Select the Patches-> click “APPROVE”
3. Filter Patches by Products
4. Filter Patches based on KB Article, Patch Title, Host Name, Logical Group Name or Organization Unit.
Select a Search filter from Search drop down box -> Enter a value in the Text Box and click “Go”
To clear the search filter, click “Clear Search”
5. Filter patches based on System Type, Patch Classification, Patch Severity and Patch Release Date
6. Click here to view the patch details
7. Click here to view the list of systems where this patch is missing
8. Click this icon to refresh the page
9. Click here to select the Patch Attribute Columns to be displayed in the patch list
List of Patches which are Approved and Waiting for Deployment
1.
Select the "Windows Patches" ![]() option.
option.
2. Manual Patch Deployment: Select “Type” as “Deploy”-> Select the Patches-> click “DEPLOY”
3. Click here to view the download link for this patch
4. Click here to Reset the Maximum Download Retry Count for this patch
5. Click here to enable or disable the Reboot Reminder for this patch
6. Click here to view the systems where this patch is missing and selectively choose the systems and deploy this patch
View Patch Deployment Status
· Go
to IT Automation Tab-> Patch Management. Select the 'Windows Patches'
![]() option.
option.
· Click "Windows Patch Deployment" tab
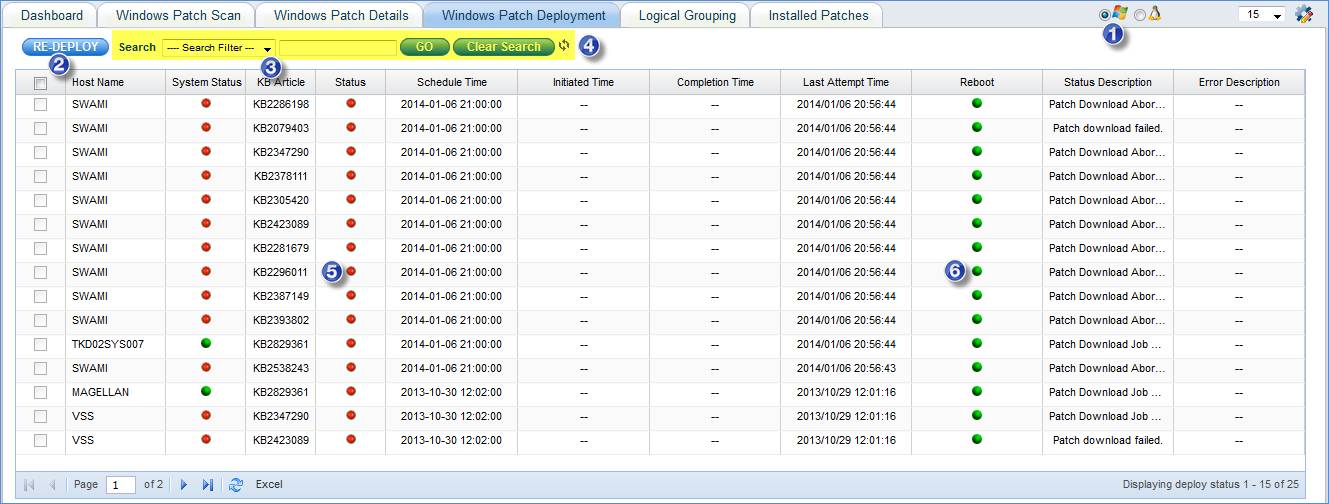
1. Select
the "Windows Patches" ![]() option
option
2. Select the patches that are failed to Deploy and click on “RE-DEPLOY”
3. Filter Patches based on KB Article, Host Name, Patch Deploy Status, Logical Group Name, Organization Unit or Bulletin Id
Select a Search filter from Search drop down box -> Enter a value in the Text Box and click “Go”
To clear the search filter, click “Clear Search”
4. Click this icon to refresh the page
5. Refers to patch deployment status (red for failure and green for success)
6. Green: Patch does not need Reboot
Red: Patch needs Reboot
View Missing Patch Status by Logical Groups
· Go to IT Automation Tab-> Patch Management-> Logical Grouping tab. Click on “ADD”
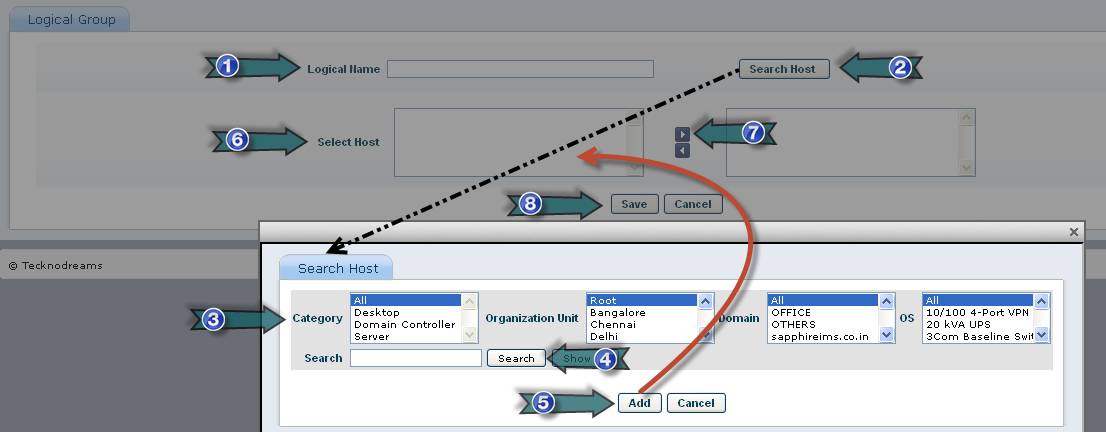
1. Type the Logical Group Name
2. Click on “Search Host”
3. Select Host Filter Criteria
4. Click on “Search”
5. Click on “Add”
6. Select the Filtered Hosts
7. Click to include the selected hosts
8. Click on “Save”
Follow the instructions given in the above screenshot to add the Logical Group. Once a Logical Group is created it will be listed in the “Logical Grouping” page

1. Click here to edit the Logical Group settings
To delete a Logical Group, select a Logical Group and click on “DELETE”. To edit the settings of a Logical Group click on the Logical Group name
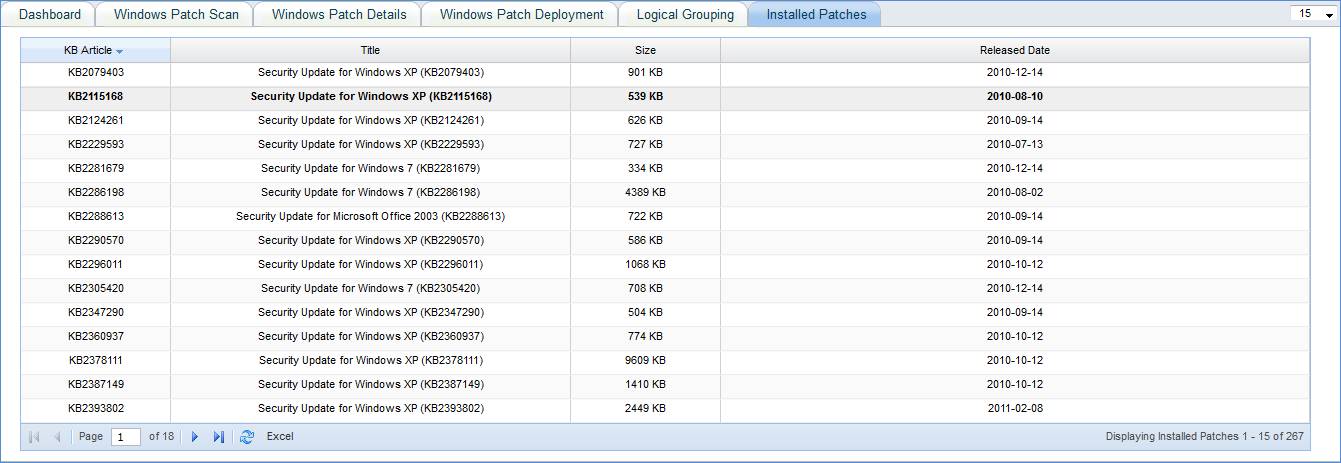
View Installed Patches List
· Go to IT Automation Tab-> Patch Management-> Installed Patches tab
Troubleshooting Guidelines for Windows Patch Management
System Errors
Ref: http://technet.microsoft.com/en-us/library/cc720442%28v=ws.10%29.aspx
Error |
Steps to take |
GetAgentInfo – wmi locator problem |
Start Windows Management Instrumentation Service. |
Failed to Create IwindowsUpdateAgentInfo - 80040155 |
Interface is not registered. Execute WindowsUpdateAgent30 exe in the server machine based upon the architecture of the machine. That exe will be in the path consolemanagement/Externalwar/patchmanagement.war |
Failed to Create IwindowsUpdateAgentInfo - 80040154 |
Class is not registered. Execute WindowsUpdateAgent30 exe in the machine where scan is failed. |
Error code – 8007000E or 80070008 |
This is microsoft issue. http://windows.microsoft.com/en-US/windows7/Windows-Update-error-80070008-or-8007000e |
Error occurs when copying files to target machine or WnetAddconnection2 fails |
- check net use \\[IP\SHARE] - Ping with hostname, it has to resolve ipaddress. If not resolved, then DNS is not configured properly. - Temporary solution is to add ipaddress and hostname in hosts file which is in the path WINDOWS\system32\drivers\etc. |
Error code 80246008 |
BITS service may be not started or not configured properly. Start BITS service. http://support.microsoft.com/kb/956706 |
Failed to set proxy blanket Possible error code : 0x80070057(E_INVALIDARG ) Authentication specified is incorrect.(one or more arguments is not valid) |
http://support.microsoft.com/KB/183214 In windows95, we have to install DCOM. |
Failed to AddScanPackageService Possible error codes: 0x80070057 (E_INVALIDARG ) - one or more arguments is not valid 0x80070005 (E_ACCESSDENIED) 0x80240036 (WU_E_INVALID_OPERATION ) |
For error code 0x80240036, we have to install windowsUpdateAgent30 exe.
|
Failed to CreateUpdateSearcher – 0x80070057 (E_INVALIDARG ) |
For error code 0x80070057, - Stop automatic update service. - From %systemroot% rename softwaredistribution folder to softwaredistribution.old - start automatic update service. |
1. Failed to Create UpdateSession 2. Failed to update service manager. Possible error codes:
REGDB_E_CLASSNOTREG – (80040154) CLASS_E_NOAGGREGATION – (80040110) CO_S_NOTALLINTERFACES – (00080012) E_NOINTERFACE – (80004002)
No such interface supported. (E_NOINTERFACE) (8004002) |
For error code 80004002, this is microsoft issue.. http://support.microsoft.com/kb/307597
For error code 80040154, save the following as bat file and run,
REGSVR32 -s ATL.DLL REGSVR32 -s MSXML3.DLL REGSVR32 -s WUAPI.DLL REGSVR32 -s WUAUENG.DLL REGSVR32 -s WUAUENG1.DLL REGSVR32 -s WUPS2.DLL REGSVR32 -s WUCLTUI.DLL REGSVR32 -s WUPS.DLL REGSVR32 -s WUWEB.DLL REGSVR32 -s QMGR.DLL REGSVR32 -s QMGRPRXY.DLL REGSVR32 -s JSCRIPT.DLL |
BITS in Windows 2000 is dependent on SENS and EventSystem services. If COM+ catalog is corrupted, one of these errors was seen.
|
Repairing a corrupted BITS configuration: http://technet.microsoft.com/en-us/library/cc720473(v=ws.10).aspx
Cleanup damaged com+ : http://support.microsoft.com/kb/315296 |
The SUS agent is attempting to parse an updates XML blob and has encountered data that is invalid WU_E_XML_INVALID (0x8024000E) |
Xml parser has to be installed in that machine. Download MSXML and install. Ref: http://www.microsoft.com/en-us/download/details.aspx?id=3988 |
Could not create an out of proc datastore object 0x80248011 |
http://support.microsoft.com/kb/883821#LetMeFixItMyselfAlways0x80248011 May occur when there is an issue with the database that stores Windows Update information or Microsoft Update information on your computer. |
Call has been cancelled Error code : 0x8024000B
|
This problem may occur if Windows Update or Microsoft Update cannot read the update manifest. |
Call was aborted due to service stop or system shut down WU_E_SERVICE_STOP(0x8024001E) |
Operation did not complete because the service or system was being shut down. |
0x8007000E
|
Not enough storage is available to complete the operation. If disk is fine, then memory is low. |
unable to write to the log file |
http://support.microsoft.com/kb/958048 This occurs when you try to connect to windows update website or microsoft update website to install updates. |
0x80080005 (CO_E_SERVER_EXEC_FAILURE) |
The machine has a high CPU load and the process takes a long time to register com factory in 120 seconds. Ref: http://blogs.msdn.com/b/adioltean/archive/2005/06/24/432519.aspx |
The digital signature of the object did not verify |
Cab file downloaded has invalid digital signature. Cab file has been corrupted. Download cab file again. |
Not a cryptographic message or the cryptographic message is not formatted correctly 0x8009200D (CRYPT_E_BAD_MSG) |
|
File is not of the right format 0x80240031 (WU_E_INVALID_FILE ) |
|
Log File Analysis
Following set of log files are related to the automation tasks module.
File Name |
Purpose |
SIMS_JobHandler.log1 |
Any debug information regarding job processing for patch scan, patch deploy (w.r.t agent less) and CAB file download related debugging can be traced with this log file. |
SIMS_ProbeScheduler.log2 |
Any debug information related to scheduling and software download informing can be traced with this log file |
server.log3 |
UI related errors can be traced with this log file |
SapphireIMSAgent4 |
Applicable only for the agent architecture. This gives the complete error codes recorded with the agent operations and communications |
WindowsUpdate.log5 |
This log is provided by Microsoft. WUA scan and deploy log can be traced here |
Note1: The log files are available in <Installed-Path>\ ConsoleManagement\log. You can also locate a file with the .bak extension.
Note 2: The log files are available in <Installed-Path>\ ConsoleManagement\log. You can also locate a file with the .bak extension.
Note 3: The log files are available in <Installed-Path>\ WebManagement\standalone\log. You can also locate a file with the .1 extension.
Note4: The log files are available in <Installed-Path>\logs. You can also locate a file with the .bak extension. Note that this is stored in the system where the agent is installed.
Note5: The log files are available in <OS Drive>\ WINDOWS
Environment Specific Debugging
· Ensure BITS and winmgmt service is running
· If proxy is enabled in network make sure the settings are properly configured in SapphireIMS
· Ensure remote network share is allowed from SapphireIMS for agent less nodes
· Ensure the Master agents are up and running
· Ensure sufficient disk space is available on Sapphire server and all of the Master agents
· At Master Agents port 6001 should be open for internal file transfers to slave agents