![]()
Ver 1.0 Date 9/9/2014
How to Discover the Network Devices using Agent-Less Approach
Overview
Detect and discover computer systems, routers, printers, switches and other devices of your organization to manage them from scratch. ’Discovery’ detects all devices within the network with the help of a profile defined in ‘Discovery Profiles and Wizard’. This profile can be configured to perform discovery across domains, within an IP range, using CIDR methodology or by configuring DHCP scope details which use a subnet mask.
The discovery is performed by using various data collection types that are specified in the credential profiles. These data collection types are WMI, SNMP (V1 & V2), WBEM & SSH, Intel-AMT and VM (for virtual machines) and LDAP (to connect to Active Directory domain controller)
Successful discovery results in detection of all the devices and application in your network. This is referred to as ‘Inventory’ in SapphireIMS which gives detailed device information when drilled down. To discover your network you need to write a discovery rule first. SapphireIMS provides a detailed discovery wizard to accomplish this. Listed below are the steps to be followed in order to complete the discovery rule configuration.
Step 1: Create Credential Profile
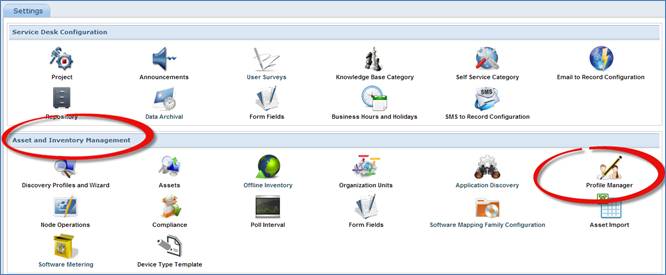
Go to Settings Tab-> Asset and Inventory Management-> Profile Manager
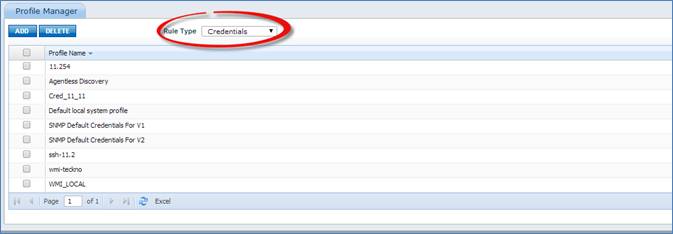
In Profile Manager select Rule Type as “Credentials” and click on “Add”
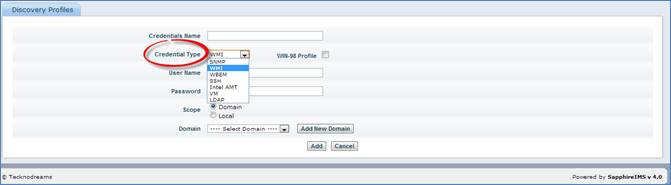
Select Credential Type
SapphireIMS uses following Industry Standard Protocols based on the Device Type and Device Operating System to discover and manage the IP Devices through Agent-Less Approach:
Sl. No. |
Device Type/OS |
Protocol |
1 |
Windows |
WMI |
2 |
Linux |
SSH |
3 |
Network Devices |
SNMP |
4 |
Unix |
WBEM |
5 |
AIX |
SNMP |
For the selected Credential Type fill the required information (e.g. if WMI is selected then fill User Name, Password and Select Scope: Domain or Local)
Click on “Add”
Step 2: Create Exclusion IP List Profile
In Settings Tab-> Profile Manager select Rule Type as “Exclusion IP List”

Click on “Add”
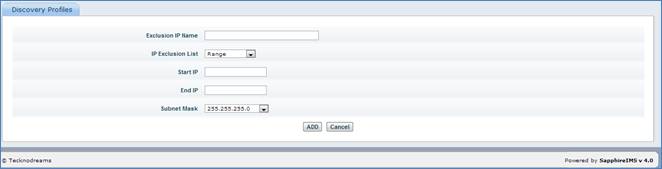
Type the Exclusion IP Name, Select IP Exclusion List (Range or Individual IP), IP Addresses and Subnet Mask
Click on “Add”
Step 3: Create DHCP Scope Profile
In Settings Tab-> Profile Manager select Rule Type as “DHCP Scope”
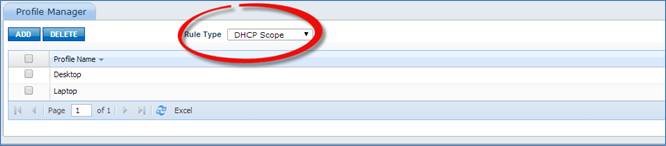
Click on “Add”
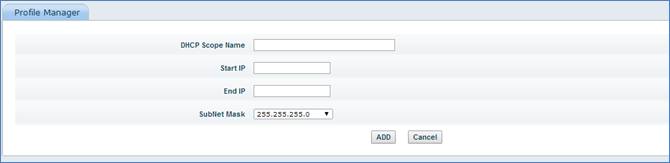
Type the DHCP Scope Name, Start IP Address, End IP Address and Subnet Mask
Click on “Add”
Step 4: Create Discovery Profile
Go to Settings Tab-> Asset and Inventory Management-> Discovery Profiles and Wizard
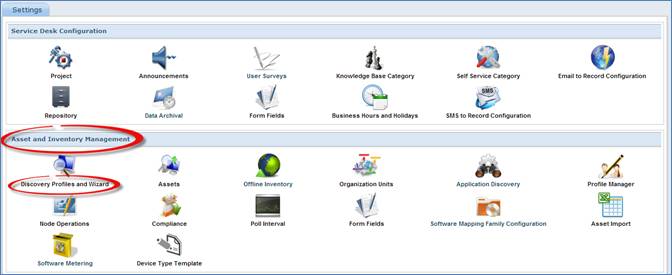
In Discovery Profiles and Wizard, click on “Add”
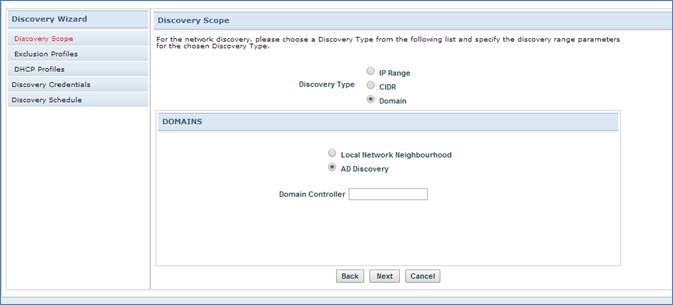
Select Discovery Type (IP Address, CIDR or Domain) and provide the required details. Click “Next”
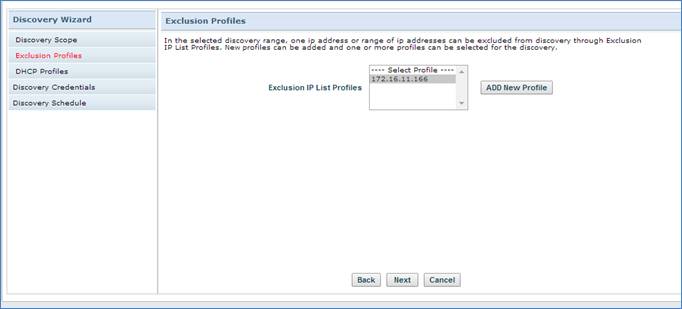
Select Exclusion IP List Profiles (optional). Click “Next”
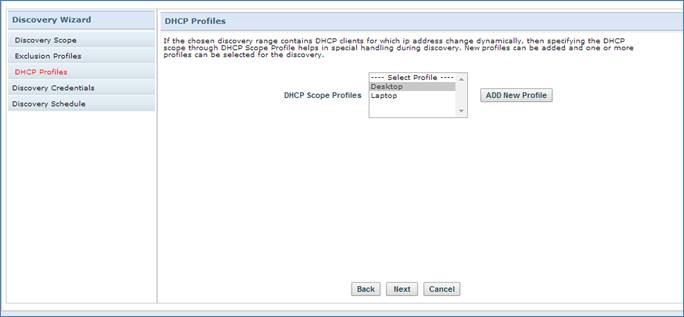
Select DHCP Scope Profiles (optional). Click “Next”
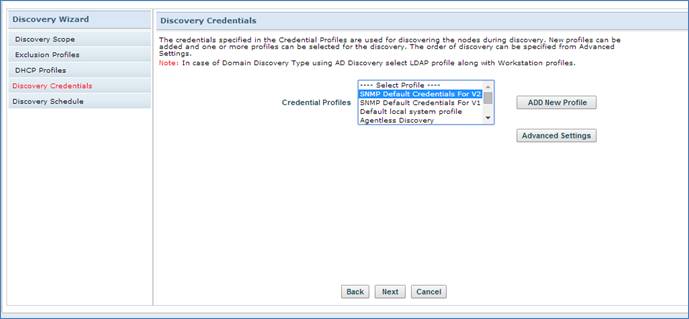
Select appropriate Credential Profiles based on the type of devices the IP Range contains. Click “Next”
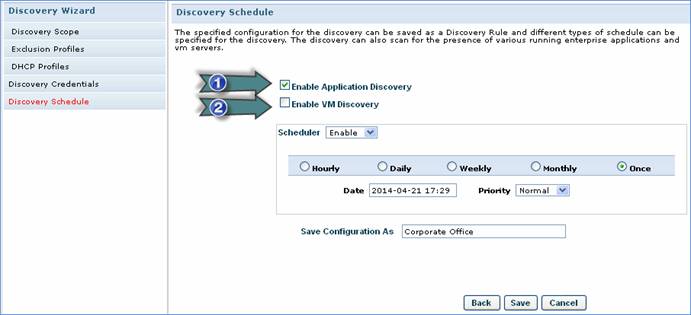
1. Check this box to enable discovery of applications
2. Check this box to enable virtual machine discovery
Choose Discover Schedule, Type Discovery Profile name in Save Configuration As and click on “Save”
Step 5: Run Discovery Rule
Go to Settings Tab-> Discovery Profiles and Wizard
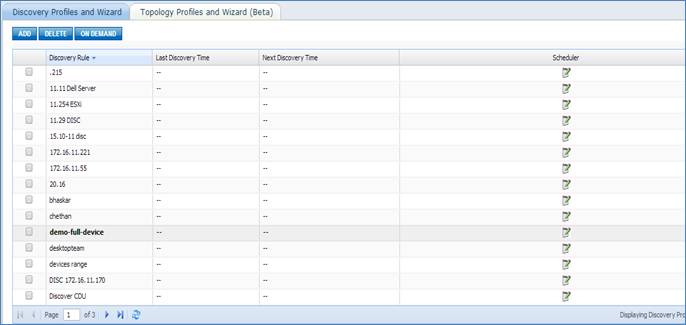
Select a Discovery Rule and click on “On Demand”. This will start a Discovery Process immediately
To change the schedule of a Discovery Rule
click on the ![]() button
in the “Scheduler” column for a Discovery Rule
button
in the “Scheduler” column for a Discovery Rule
To check the Discovery Progress Status go to Inventory Tab-> Discovery-> Discovery Status tab
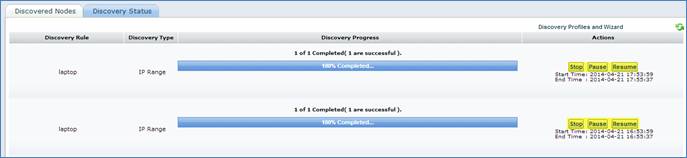
You can Stop Pause or Resume a Discovery Rule using the buttons in the “Actions” column
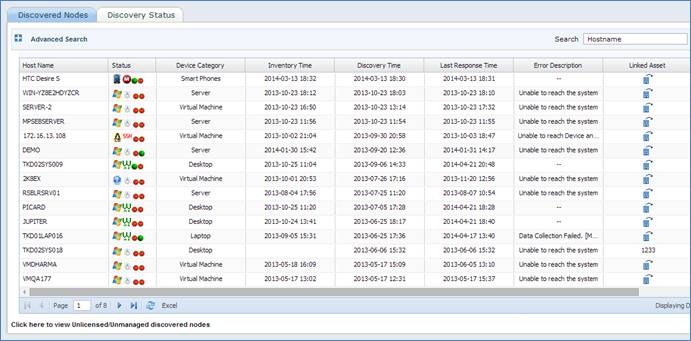
Step 6: Identify Discovered Nodes
Go to Inventory Tab-> Discovery. This page will list all the successfully discovered devices
View Inventory Data of a specific device
SapphireIMS allows you to perform an on-demand job of viewing inventory data of any discovered device.
Click the host name of the device to view the device summary
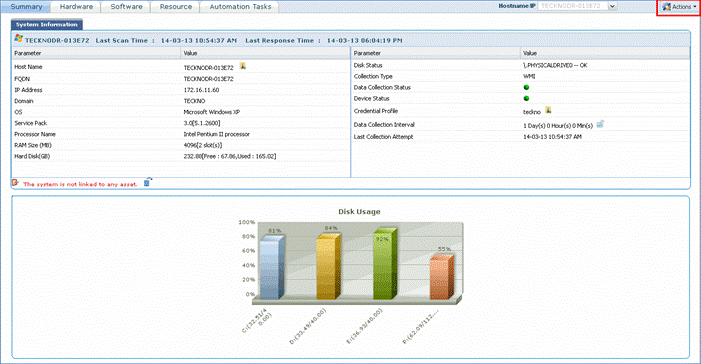
In the ‘Actions’ drop down, click ‘Get Inventory Data’ to post the job of fetching the latest inventory data for the device.
View devices for which inventory data collection is unsuccessful
Go to Settings Tab-> Node Operations. In “Scope” dropdown list select “Unmanaged devices”. This page will list all the devices which have been discovered but Inventory is not successful
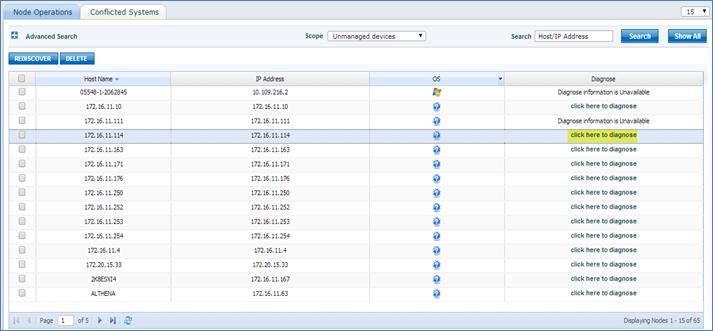
Click on “Click here to diagnose” for a device
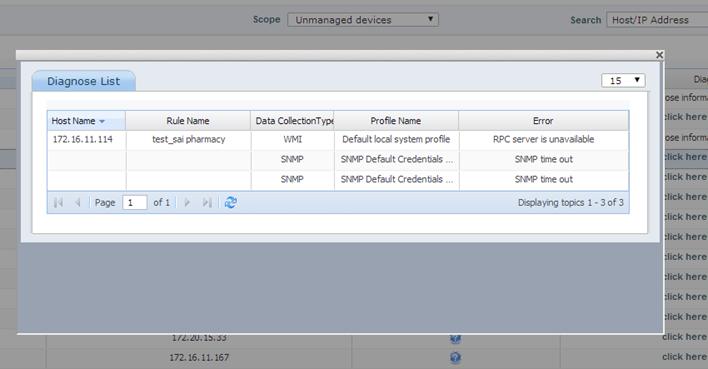
This will open a popup window and display the issue, e.g. for WMI: RPC server is unavailable (WMI Port is Blocked or RPC service is not running), COM Access Denied (Invalid Username and Password) etc. Please refer to the SapphireIMS Prerequisites Document to fix the issue
Once the issue is fixed select the affected devices and click on “Rediscover” button. Click on the “Ok” button in the “Selected systems(s) will be Rediscovered....” popup message. This will open the “Data Collection Type” popup window

Select the appropriate “Data Collection Type” and “Credential Profile” and click on “Update”. This will try to rediscover the selected devices
Sometimes due to lack of licenses a device may not be discovered successfully. In “Scope” dropdown list select “Unlicensed devices”. This will list all the unlicensed devices
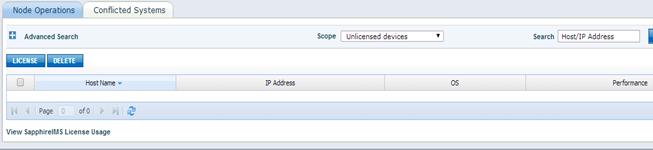
Select the required devices and click on “License”. This will add the devices to either “Managed” or “Unmanaged” Devices category based on the discovery status
Note: You can free up licenses either by deleting Managed or Unmanaged Devices from Node Operation page or by upgrading the License (Please contact SapphireIMS Sales Team to upgrade license). To view the License Usage Status, go to Settings Tab-> SapphireIMS License Usage
Once an Agent is installed on a device and it is discovered by the SapphireIMS Server, the device is auto categorized into a specific Device Category (e.g. Desktop, Laptop, Server etc)
To change the Device Category on a device go to Settings Tab-> Node Operations. In “Scope” dropdown list select “Map System Category”
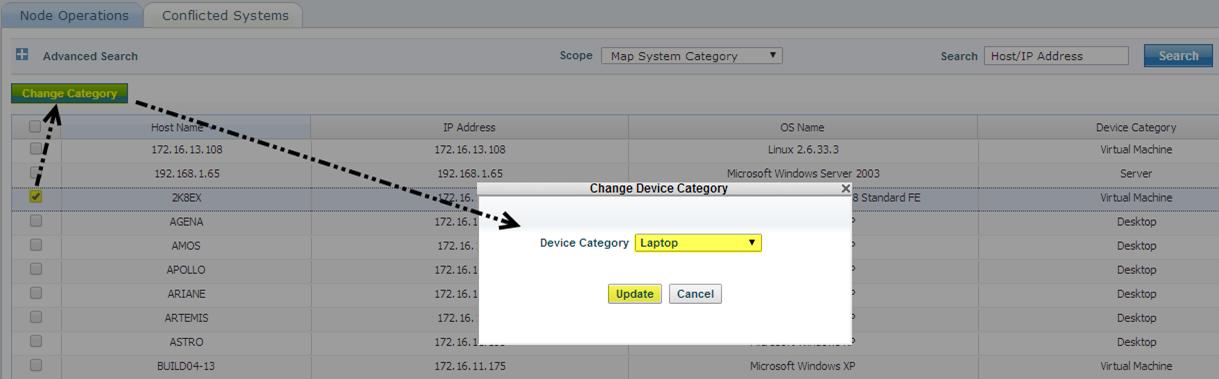
Select the required devices, click on “Change Category”. This will open a pop-up window
Select the new device category from the “Device Category” dropdown list and click on “Update”
Note: The device types for which changing the Device Category is allowed are: Desktop, Laptop, Server, Virtual Machine and Domain Controller
Troubleshooting Guidelines for Discovery
To discover the node successfully, following steps need to be performed
1) Target node should be able to respond to ping request from SapphireIMS server.
2) The node should not be under ‘Plan Maintenance’ or it should not be in ‘Exclusion List’ or ‘Deleted state’. These cases can occur if the node is previously discovered by SapphireIMS.
3) Discovery will use the configured credentials in order to discover the node.
Discovery uses the following protocols to discover the node, namely WMI, SNMP, SSH and WBEM.
The following discovery data is required for the node to be successfully discovered and managed.
1) IP Address
2) Host Name
3) OS Name
4) BIOS Serial No
5) MAC Address
1.Discovery data collection using WMI
System Errors
Error Code |
Recommendation |
COM access denied error |
Provided credentials are improper with respect to profile rules mapped |
RPC server is unavailable |
Windows Firewall is blocking (need to disable or need to add port exception) or RPC Service is not running. |
Diagnoses information/Error is unavailable |
There are various reasons, such as i) device is deleted and moved to unmanaged state ii) device is unable to resolve to IP/Hostname or the device is not supported |
Discovery data could not be collected |
Domain mapping is wrong |
Feature or operation is not supported |
WMI class is not found in the WMI Repository |
Note: If node is not under “Manage” state, check the following conditions:
1. Check the license.
2. Node should not be under planned maintenance and should not be in “Deleted” state.
3. Check the reason for not collecting basic discovery data like MAC, OS, BIOS
4. In case of windows devices, you can do a WBEM test to check basic discovery data and in the case of snmp devices, check whether snmp walk is happening.
Log File Analysis
The following are the log files that are related to this module
File Name |
Purpose |
SIMS_NodeScanner |
Any action after a Discovery Rule is scheduled can be traced using this file |
SIMS_probescheduler |
Any errors with respect to scheduling the job can be traced here |
Note: The log files are available in <Installed-Path>\logs. You can also locate a file with the ‘.bak’ extension. Note that this is stored in the system where Sapphire is installed
Environment Specific Debugging
Ensure that the SIMS_WMICollect.exe is running. To verify this, go to Windows Task Manager and check whether the SIMS_WMICollect.exe is running.
1) 135 (TCP) [Used by DCOM for Microsoft RPC] is open.
2) The following services should be running and the services should be configured to start automatically after system restart.
• COM+ Event System
• Remote Access Auto Connection Manager
• Remote Access Connection Manager
• Remote Procedure Call (RPC)
• Remote Procedure Call (RPC) Locator
• Remote Registry
• Server
• Windows Management Instrumentation
• Windows Management Instrumentation Driver Extensions
• WMI Performance Adapter
• Workstation
• Server
• WMI Performance Adapter Workstation
3) Credential has to be “User Account with Domain Administrator privilege” [For Windows Domain environment] or “User Account with Local Administrator privilege” [For Windows Workgroup environment].
4) “Wbemtest” (Run->Wbemtest) has to be successful.
2. Discovery data collection using SNMP discovery
SNMP data collection type is used for collecting data from systems (and devices like routers/switches) where SNMP service is enabled.
System Errors
Error Code |
Recommendation |
SNMP time out |
Provided community string does not match the snmp profile or SNMP version is not enabled in the device or Unable to get the snmp walk due to unavailability of snmp-agent |
Log File Analysis
The following are the log files that are related to this module
File Name |
Purpose |
SIMS_SnmpCollect.log |
Any action after an on-demand data collection can be traced using this file or when the snmp data collection is scheduled. |
SIMS_probescheduler |
Any errors with respect to scheduling the job can be traced here |
Note: The log files are available in <Installed-Path>\logs. You will also locate a file with the .bak extension. Note that this is stored in the system where Sapphire is installed
Environment Specific Debugging
Ensure that the SIMS_SNMP.exe is running. To verify this ‘Go to Windows Task Manager and check whether the SIMS_SNMP.exe is running ’
1) 161 (UDP) or User Specified Port [To communicate to SNMP Agent] to be open
2) Make sure SapphireIMS installed probe is listed in the snmp configuration on the target server as an allowed snmp management station
3) Make sure the snmp community string you are using is correct
4) Make sure the snmp version is appropriate for data collection
5) Make sure there is no firewall running on probe server that may block snmp traffic
6) Make sure there is no real firewall between probe server and target server blocking snmp traffic
7) Increase the time out for the snmp request (up to 30 sec)
8) Use Settings-> Tools -> SNMP walk to do snmp walk explicitly
9) Also use the following command to get the complete SNMP walk of the device,
SNMP V1: <Directory Path\ ConsoleManagement\bin>snmpwalk.exe -c public –v 1 [IPAddress] [oid] > c:\snmpwalk.txt
E.g.: <Directory Path\ ConsoleManagement\bin>snmpwalk.exe -c public –v 1 [172.16.11.1] [.1.3] > c:\snmpwalk.txt
SNMP V2: <Directory Path\ ConsoleManagement\bin>snmpwalk.exe -c public -v 2c [IPAddress] [oid] > c:\snmpwalk.txt
E.g.: <Directory Path\ ConsoleManagement\bin>snmpwalk.exe -c public -v 2c [172.16.11.1] [.1.3] > c:\snmpwalk.txt
SNMP V3: <Directory Path\ ConsoleManagement\bin>snmpwalk.exe -c public -v 3 –u [securityName] –l [securityLevel] –a [authProtocol] –A [authKey] –x [privProtocol] –X [privKey] [IPAdress] [oid] > c:\snmpwalk.txt
E.g.: <Directory Path\ ConsoleManagement\bin>snmpwalk.exe -c public -v 3 –u test –l authPriv –a MD5 –A Password –x DES –X Password 172.16.11.1 .1.3 > c:\snmpwalk.txt
In a situation where you get the "Error: OID not increasing" while taking the snmp walk, the following command should be used: -Cc
E.g.: <Directory Path\ ConsoleManagement\bin>snmpwalk.exe –Cc -c public -v 2c [172.16.11.1] [.1.3] > c:\snmpwalk.txt
3. SSH (Secure Shell)
SSH data collection type is used to collect data from UNIX systems.
3. Discovery data collection using SSH
1. The following data, also called ‘Discovery key’ is required to make the node as managed
Ø Hostname
Ø SerialNumber
Ø MACAddress, IPAddress, DHCP Enabled, DefaultIPGateway
Ø Domain, name, DomainRole, Model
System Errors
Error Code |
Recommendation |
Connection timeout |
SSH client may not be able to get response within the mentioned global setting value (by default 120 seconds) due to slow target machine or wrong port configuration in SSH credential profile. |
Unable to authenticate |
Wrong username/password is provided |
Tty required |
No defaults requiretty has been set for the authenticated user |
No such file/directory: /opt/SapphireIMS/ssh_datacollect.sh |
SapphireIMS script deployment failed on the target UNIX machine |
Log File Analysis
The following are the log files that are related to this module
File Name |
Purpose |
SIMS_NodeScanner |
Any action after a Discovery Rule is scheduled can be traced using this file |
SIMS_probescheduler |
Any errors with respect to scheduling the job can be traced here |
Note: The log files are available in <Installed-Path>\logs. You can also locate a file with the .bak extension. Note that this is stored in the system where Sapphire is installed
Environment Specific Debugging
Ensure that the SIMS_Nodescanner.exe is running. To verify this, go to Windows Task Manager and check whether the SIMS_Nodescanner.exe is running.
1) 22 (TCP) [Used by Secure Shell] is open
2) If SUDO account has been provided for discovery, set the permission for the following commands:
/dev/mem,/sbin/ethtool,/usr/sbin/smartctl,/bin/rm,/usr/sbin/dmidecode,<install-path>/bin/lshw,<install-path>/bin/sdparm,/bin/tar,/bin/zcat,/bin/gzcat
3) Requiretty has to be disabled for the specified user
4) Make sure that the target machine was deployed with SapphireIMS scripts
By default, the deploy path will be '/opt/SapphireIMS’; this is a global settings key which can be changed
5) Connect the target UNIX machine using putty, using the credential provided, and execute the following command in the terminal.
Note: Here '/opt/SapphireIMS' is configurable and if logged-in usingf SUDO user instead of -nosudo -sudo should be provided
4. Discovery data collection using WBEM
WBEM data collection type is used for collecting data from UNIX systems.
1. The following data, also called ‘Discovery key’ is required to make the node as a managed node
Ø Hostname – PG_ComputerSystem or Solaris_ComputerSystem
Ø SerialNumber - PG_ComputerSystem or Solaris_ComputerSystem
Ø MACAddress, IPAddress, DHCP Enabled, DefaultIPGateway – Linux_EthernetPort or Solaris_EthernetAdapter.
Ø Domain, name, DomainRole, Model- Linux_EthernetPort or Solaris_EthernetAdapter
System Errors
Error Code |
Recommendation |
Unable to authenticate |
Incorrect username/password is provided |
Unable to connect |
Port configuration or no response from the target machine |
Log File Analysis
The following are the log files that are related to this module
File Name |
Purpose |
SIMS_NodeScanner |
Any action after a Discovery Rule is scheduled can be traced using this file |
SIMS_probescheduler |
Any errors with respect to scheduling the job can be traced here |
Note: The log files are available in <Installed-Path>\logs. You can also locate a file with the .bak extension. Note that this is stored in the system where Sapphire is installed
Environment Specific Debugging
Ensure that the SIMS_Nodescanner.exe is running. To verify this ‘Go To Windows Task Manager and check whether the SIMS_Nodescanner.exe is running.
1) 5988 (TCP) [Used by WBEM server] is open
2) Make sure that the target machine has WBEM server installed
Troubleshooting Guidelines for Inventory Data Collection - WMI
SapphireIMS supports and monitors Windows systems using Windows Management Instrumentation (WMI) protocol. The support includes management of discovery and inventory data collection. SIMS_WMICollect is the executable responsible for collecting WMI inventory data.
WMI datacollector supports following Inventory types:
w Hardware Inventory (InventoryType ‘1’)
w Software Inventory (InventoryType ‘2’)
w Custom Inventory (InventoryType ‘3’)
w FileTrawl Inventory (InventoryType ‘4’)
System Errors
Error Code |
Recommendation |
COM access denied error |
Provided credentials are improper with respective profile rules mapped. |
RPC server is unavailable |
Windows Firewall is blocking (need to disable or need to add port exception) or RPC Service is not running. |
Feature or operation is not supported(On partial data collection) |
If WMI class not found in the WMI Repository |
Data collection is failed due to MACID mismatch |
If Current (queried during Inventory) Mac and repository Mac are distinct |
Data collection is failed due to OS name mismatch |
If Current (queried during Inventory) OS and repository OS are distinct |
Data collection is failed due to BIOS serial number mismatch |
If Current (queried during Inventory) BIOS and repository BIOS are distinct |
Case1: DataCollection failure due to ‘Discovery key mismatch’ can cause due to DNS refresh issue as well and this can be momentarily. To resolve this follow the steps as below:
Step 1: Post Get Inventory Data.
Step2: If #1 does not resolve the issue, perform the Reset Discovery Key operation.
Case2: DataCollection failure due to ‘BIOS serial number mismatch’
Step1: If Collected bios serial number is not a valid string Example: "To be filled by O.E.M." or any junck characters . Refer this link to add invalid bios serial numbers.
http://(Server IP)/SapphireIMS/ExcludedBIOSNumbers.jsp
Step2: Do the Discovery of the device and Post Get Inventory Data.
Case3: Delay in Scheduling the on-demand jobs
Execute -- Call Load_Distribution(3,60);
Case4: DNS entries have to be up to date
Please check the same using the command ‘nslookup ( give ipaddress or hostname)’
Log File Analysis
The following are the log files that are related to this module
File Name |
Purpose |
SIMS_WMICollect.log |
Any action after a job is scheduled can be traced using this file |
SIMS_ProbeSchedular |
Any errors with respect to scheduling the job can be traced here |
Note: The log files are available in <Installed-Path>\ConsoleManagement\logs. You can also locate a file with the .bak extension.
Environment Specific Debugging
1) Ensure that the SIMS_WMICollect.exe is running. To verify this ‘Go to Windows Task Manager and check whether the SIMS_ WMICollect.exe is running ’.
2) 135 (TCP) [Used by DCOM for Microsoft RPC] is open.
3) The following services should be running and the services should be configured to start automatically after system restart.
• COM+ Event System
• Remote Access Auto Connection Manager
• Remote Access Connection Manager
• Remote Procedure Call (RPC)
• Remote Procedure Call (RPC) Locator
• Remote Registry
• Server
• Windows Management Instrumentation
• Windows Management Instrumentation Driver Extensions
• WMI Performance Adapter
• Workstation
• Server
• WMI Performance Adapter Workstation
4) Credential has to be “User Account with Domain Administrator privilege” [For Windows Domain environment] or “User Account with Local Administrator privilege” [For Windows Workgroup environment].
5) “Wbemtest” (Run->Wbemtest) has to be successful.
Troubleshooting Guidelines for Inventory Data Collection – SNMP
Monitoring devices through SNMP mainly depends on the device type and category of the device. Devices that typically support SNMP include routers, switches, servers, workstations, printers etc. SIMS_SNMP is the executable responsible for collecting snmp inventory data.
SNMP data collector supports Hardware (InventoryType ‘1’) and Software Inventory (InventoryType ‘2’) of the devices and it does not support Custom and File Trawl Inventory.
System Errors
Error Code |
Recommendation |
SNMP time out |
Provided community string is not proper with respective to snmp profile or SNMP version is not enabled in the device or Unable to get the snmpwalk due to snmp-agent might be down. |
Data collection is failed due to MACID mismatch |
If Current (queried during Inventory) Mac and repository Mac are distinct |
Data collection is failed due to OS name mismatch |
If Current (queried during Inventory) OS and repository OS are distinct |
Data collection is failed due to BIOS serial number mismatch |
If Current (queried during Inventory) BIOS and repository BIOS are distinct |
NOTE:
Case1: DataCollection failure due to ‘Discovery key mismatch’ can cause due to DNS refresh issue as well and this can be momentarily. To resolve this follow the steps as below:
Step 1: Post Get Inventory Data.
Step2: If #1 does not resolve the issue, Perform Reset Discovery Key operation.
Case2: Delay in Scheduling the on demand jobs
Execute -- Call Load_Distribution(3,60);
Case3: DNS entries have to be up to date
Please check the same using the command ‘nslookup ( give ipaddress or hostname)’
Log File Analysis
The following are the log files that are related to this module
File Name |
Purpose |
SIMS_SNMPCollect.log |
Any action after a job is scheduled can be traced using this file |
SIMS_ProbeSchedular |
Any errors with respect to scheduling the job can be traced here |
Note: The log files are available in <Installed-Path>\ConsoleManagement\logs. You will also locate a file with the .bak extension.
Environment Specific Debugging
1. Ensure that the SIMS_SNMP.exe is running. To verify this ‘Go to Windows Task Manager and check whether the SIMS_SNMP.exe is running ’.
2. 161 (UDP) or User Specified Port [To communicate to SNMP Agent] to be open.
Make sure SapphireIMS installed probe is listed in the snmp configuration on the target server as an allowed snmp management station.
Make sure the snmp community string you are using is correct.
Make sure snmp version is proper with which we are trying to collect the data.
Make sure there is no firewall running on probe server that maybe blocking snmp traffic
Make sure there is no real firewall between probe server and the target server blocking snmp traffic.
In the case of delayed response from the snmp agent Increase the time out for the snmp request (upto 30 sec).
Troubleshooting Guidelines for Inventory Data Collection - SSH
SapphireIMS supports and monitors the UNIX systems using Secure Shell (SSH) protocol. The support includes management of discovery and inventory data collection. SIMS_SSHDatacollect is the executable responsible for collecting SSH inventory data.
SSH datacollector supports following Inventory types:
Hardware Inventory (InventoryType ‘1’)
Software Inventory (InventoryType ‘2’)
FileTrawl Inventory (InventoryType ‘4’)
System Errors
Error Code |
Recommendation |
Unable to authenticate. |
Provided credentials are improper with respective profile rules mapped. |
Network error: Connection timed out. |
Windows Firewall is blocking (need to disable or need to add port exception) or Vim service is not running. |
Feature or operation is not supported (On partial data collection). |
If the corresponding UNIX command is not available in the target machine. |
Case1: Data Collection failure due to ‘Discovery key mismatch’ can cause due to DNS refresh issue as well and this can be momentarily. To resolve this follow the steps as below:
Step 1: Post Get Inventory Data.
Step2: If #1 does not resolve the issue, perform the Reset Discovery Key operation.
Case2: Data Collection failure due to ‘BIOS serial number mismatch’
Step1: If Collected bios serial number is not a valid string Example: "To be filled by O.E.M." or any junk characters . Refer this link to add invalid BIOS serial numbers.
http://(Server IP)/SapphireIMS/ExcludedBIOSNumbers.jsp
Step2: Do the Discovery of the device and Post Get Inventory Data.
Case3: Delay in Scheduling the jobs
Execute -- Call Load_Distribution(3,60);
Log File Analysis
The following are the log files that are related to this module
File Name |
Purpose |
SIMS_SSHDatacollect.log |
Any action after a job is scheduled can be traced using this file |
SIMS_ProbeSchedular |
Any errors with respect to scheduling the job can be traced here |
Note: The log files are available in <Installed-Path>\ConsoleManagement\log. You can also locate a file with the .bak extension.
Environment Specific Debugging
Ensure that the SIMS_SSHDatacollect.exe is running. To verify this ‘Go to Windows Task Manager and check whether the SIMS_ SSHDatacollect.exe is running’.
22 (TCP) [Used by Secure Shell] is open.
Authenticate into the target machine using provided credential through putty client.
Go to '/opt/SapphireIMS' directory using cd /opt/SapphireIMS command. Check if the directory is available. Then list the content available inside using 'ls' command. This ensures that SapphireIMS Shell script is deployed in target machine properly.
Troubleshooting Guidelines for WBEM Inventory
SapphireIMS supports and monitors the UNIX systems using WBEM protocol. The support includes management of discovery and inventory data collection. SIMS_WBEMDatacollect is the executable responsible for collecting WBEM inventory data.
WBEM datacollector supports following Inventory types:
Hardware Inventory (InventoryType ‘1’)
Software Inventory (InventoryType ‘2’)
System Errors
Error Code |
Recommendation |
Unable to authenticate. |
Provided credentials are improper with respective profile rules mapped. |
Unable to connect |
Windows Firewall is blocking (need to disable or need to add port exception) or WBEM is not running. |
Data collection is failed due to MACID mismatch |
If Current (queried during Inventory) Mac and repository Mac are distinct |
Data collection is failed due to OS name mismatch |
If Current (queried during Inventory) OS and repository OS are distinct |
Data collection is failed due to BIOS serial number mismatch |
If Current (queried during Inventory) BIOS and repository BIOS are distinct |
Case1: DataCollection failure due to ‘Discovery key mismatch’ can cause due to DNS refresh issue as well and this can be momentarily. To resolve this follow the steps as below:
Step 1: Post Get Inventory Data.
Step2: If #1 does not resolve the issue, perform the Reset Discovery Key operation.
Case2: DataCollection failure due to ‘BIOS serial number mismatch’
Step1: If Collected bios serial number is not a valid string Example: "To be filled by O.E.M." or any junk characters . Refer this link to add invalid BIOS serial numbers.
http://(Server IP)/SapphireIMS/ExcludedBIOSNumbers.jsp
Step2: Do the Discovery of the device and Post Get Inventory Data.
Case3: Delay in Scheduling the jobs
Execute -- Call Load_Distribution(3,60);
Log File Analysis
The following are the log files that are related to this module
File Name |
Purpose |
SIMS_WBEMDatacollect.log |
Any action after a job is scheduled can be traced using this file |
SIMS_ProbeSchedular |
Any errors with respect to scheduling the job can be traced here |
Note: The log files are available in <Installed-Path>\ConsoleManagement\log. You can also locate a file with the .bak extension.
Environment Specific Debugging
Ensure that the SIMS_WBEMDatacollect.exe is running. To verify this ‘Go to Windows Task Manager and check whether the SIMS_ WBEMDatacollect.exe is running’.
5988 (TCP) [Used by WBEM] is open.
Troubleshooting Guidelines for Application Discovery
Sapphire supports discovery of following applications.
1. SMTP Server runs on port 25
2. POP3 Server runs on port 110
3. IMAP Server runs on port 143
4. WEB Server runs on port 80 , 81, 8080, 8008, 8090, 9080, 7001
5. FTP Server runs on port 21
6. MySQL Server runs on port 3306
7. Oracle Server runs on port 1521, 1526, 2483
8. DHCP Server runs on port 67
9. DNS Server runs on port 53
10. Radius Server runs on port 1812
11. MSSQL Server runs on port 1433
12. LDAP Server runs on port 389
Log File Analysis
The following are the log files that are related to this module
File Name |
Purpose |
SIMS_ Nodescanner.log |
Any action after a job is scheduled can be traced using this file |
Note: The log files are available in <Installed-Path>\ConsoleManagement\logs. You can also locate a file with the .bak extension.
Environment Specific Debugging
Ensure that the SIMS_Nodescanner.exe is running. To verify this ‘Go to Windows Task Manager and check whether the SIMS_ Nodescanner.exe is running ’.