![]()
Ver 1.0 Date 9/9/2014
How to Install Agents on Windows Systems and Discover them
Overview
SapphireIMS agent is executable software, which should be installed in the client systems that will act as an agent for the SapphireIMS server. The server will be responsible for configuring the desktop management tasks and controlling the client systems.
SapphireIMS allows you to implement a self extractor for agents or create an agent installer package which can be deployed on any system to make it an agent node. SapphireIMS agent can also be installed from SapphireIMS portal to a range of machines by specifying the IP address of the destination machines.
Step 1: Create Agent Install Package
Go to Settings Tab-> IT Automation-> Agent Installer. Click on “Add”

This will open the “Agent Install Package Creation” page. Provide the necessary information and click on “Create Package”

1. Type Agent Package Name
2. Type Agent Package Description
3. Auto Populated
4. Auto Populated
5. Select the OU to which the Agent will check-in
6. Check this box if SapphireIMS Web Server is using HTTPS
7. Check this box to suppress menu during installation
8. Provide this information if the Agent System is using Proxy Internet Connection
9. Port to be used by VNC for Remote Control
10. Check this box to run this package as a specific user and select a credential profile
11. Select required option
12. Click “Create Package”
This will create an Agent Install Package and list it on the Agent Installer page

Step 2: Install Agent
Method 1: Install Agent Manually
Go to Settings Tab-> IT Automation-> Agent Installer

1. Click here to download the Agent Installer Package
2. Click here to copy the Agent Installer Package download link
Download the Agent Installer Package (Executable or Zipped Format) to install the Agent on a system (or)
Copy the Agent Installer Package Download Link. Download the Agent Installer Package from the download link and install it a system (or)
Circulate the Agent Installer Package file or the Download Link to the End Users to install the Agent by themselves
Note: While creating the Agent Installer Package if “Launch Process in another account” is checked along with correct WMI Credential Profile then a Windows User having Non-Administrator Privilege can install the Agent
Method 2: Installing the Agent using Active Directory
Go to Settings Tab-> IT Automation-> Agent Installer. Download the executable version of the Agent Installer Package
In the Active Directory Start-up Policy create a Start-up Script to execute the Agent Installer Executable file
Note: In the In Settings Tab-> IT Automation-> Agent Installer-> Add page choose “If Agent exists, abort installation”
Method 3: Installing Agent automatically and centrally using SapphireIMS UI
Go to IT Automation Tab-> Automation Tasks-> Create Automation Task-> Discovery-> SapphireIMS Agent Installation
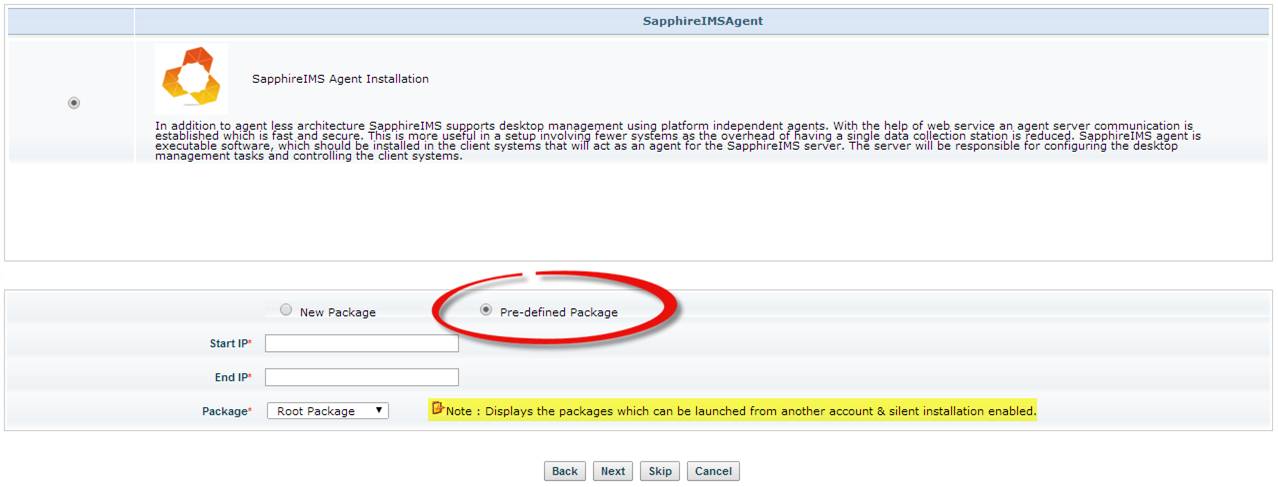
Select “Pre-defined Package”, Type the Start IP Address, Type End IP Address, Select the Agent Installer Package to install. Click on “Next”
Note: In the Package dropdown list it will display only those Agent Installer Packages which are created with “Silent Installation” and “Launch Process in another account” checked
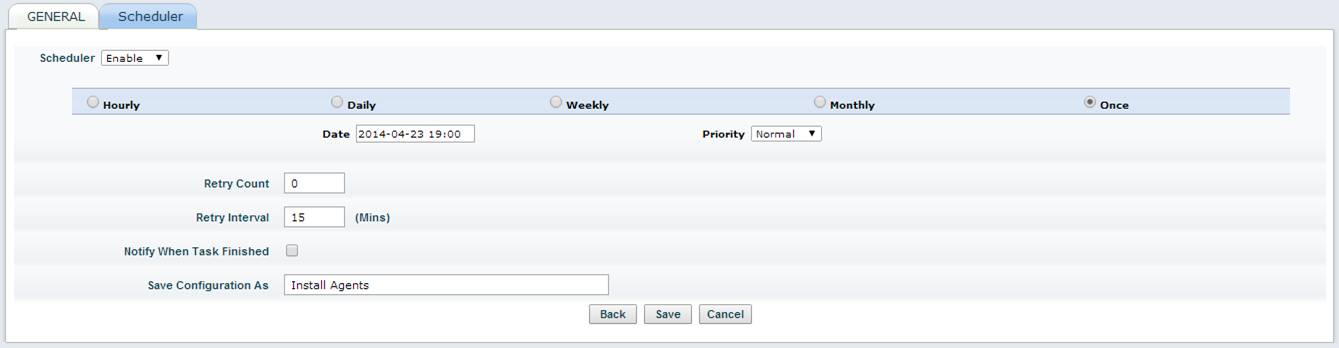
Select the Task Schedule (For immediate run select “Once” with Current Date and Time), Type the Task Name in “Save Configuration As” and click on “Save”
This will create the Agent Installation Automation Task which will be listed in the “View Automation Tasks” tab
To track the status of the task go to “Automation Task Status” tab, click on the Task Name
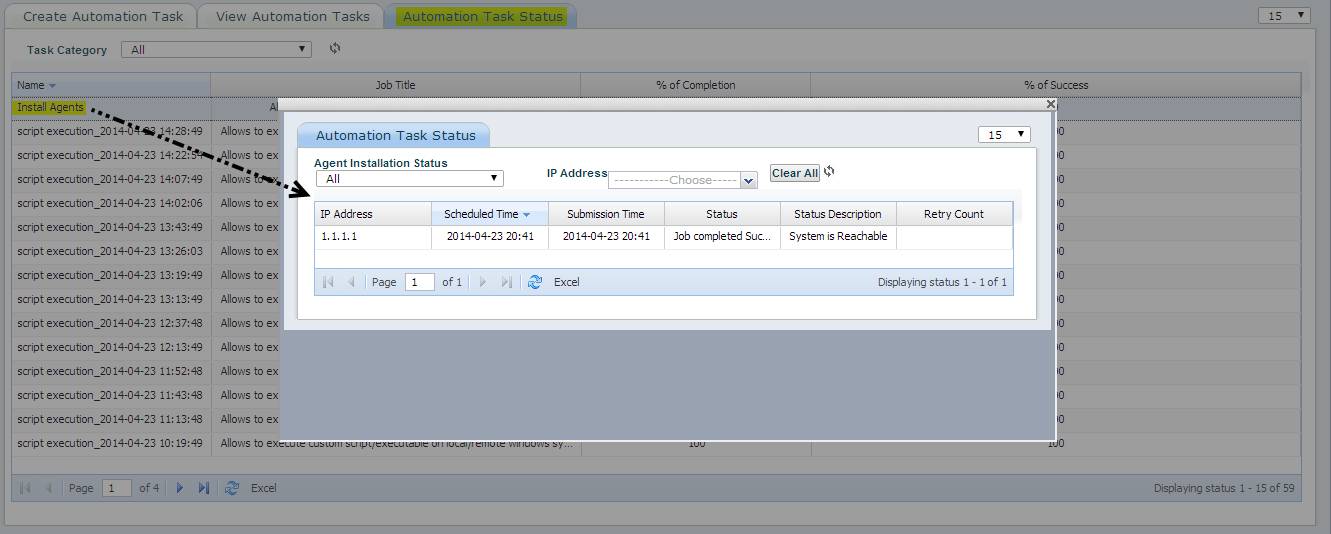
This will open a pop-up window with detailed Task Status
Note: It is also possible to install Agent using SapphireIMS UI without creating an Agent Installer Package
Go to IT Automation Tab-> Automation Tasks-> Create Automation Task-> Discovery-> SapphireIMS Agent Installation
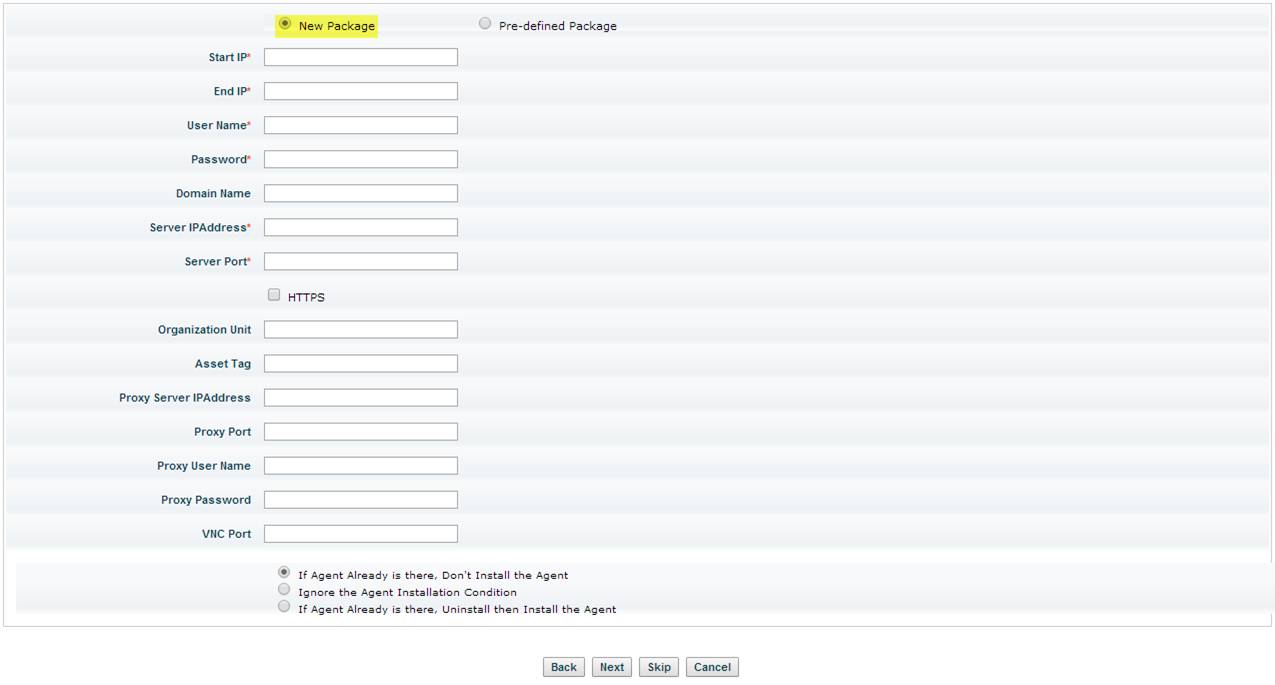
Select “New Package” and type the required information. Click on “Next”
Select the Task Schedule (For immediate run select “Once” with Current Date and Time), Type the Task Name in “Save Configuration As” and click on “Save”
This will create the Agent Installation Automation Task which will be listed in the “View Automation Tasks” tab
To track the status of the task go to “Automation Task Status” tab, click on the Task Name. This will open a pop-up window with detailed Task Status
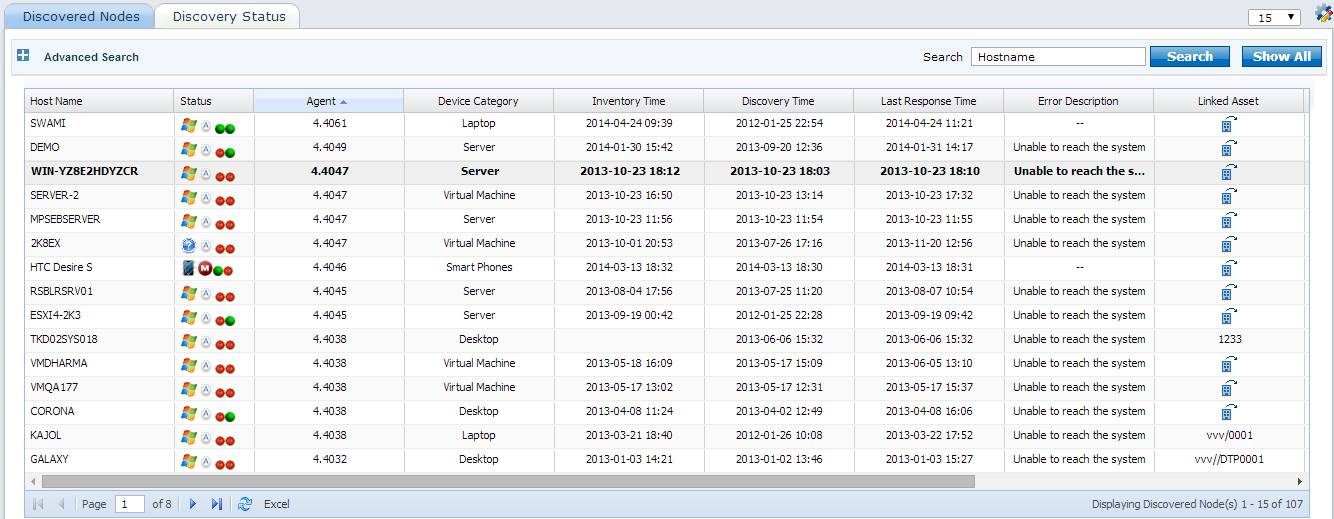
Step 3: Identify Installed Agents
Go to Inventory Tab-> Discovery. This page
will list all the successfully discovered devices. Any device
with the ![]() marker represents a device with Agent
installed
marker represents a device with Agent
installed
Sometimes due to lack of licenses an Agent may not be discovered successfully
To identify these Unlicensed Agents go to Settings Tab-> Node Operations. In “Scope” dropdown list select “Agent Unlicensed devices”. This will list all the unlicensed agents

Select the required devices and click on “License”. This will add the devices to “Managed Devices” category
Note: You can free up licenses either by deleting Agents from “Managed devices” or “Agent Unlicensed devices” from Node Operation page or by upgrading the License (Please contact SapphireIMS Sales Team to upgrade license). To view the License Usage Status, go to Settings Tab-> SapphireIMS License Usage
Once an Agent is installed on a device and it is discovered by the SapphireIMS Server, the device is auto categorized into a specific Device Category (e.g. Desktop, Laptop, Server etc)
To change the Device Category on a device go to Settings Tab-> Node Operations. In “Scope” dropdown list select “Map System Category”
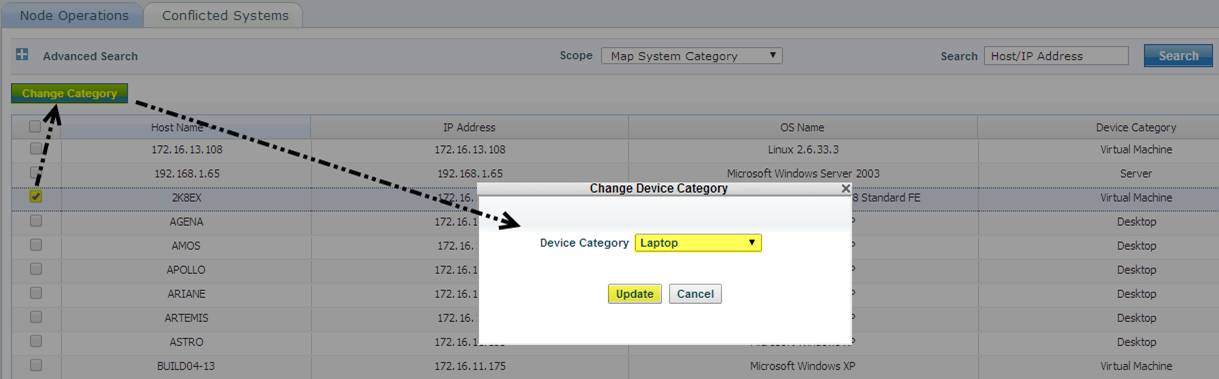
Select the required devices, click on “Change Category”. This will open a pop-up window
Select the new device category from the “Device Category” dropdown list and click on “Update”
Note: The device types for which changing the Device Category is allowed are: Desktop, Laptop, Server, Virtual Machine and Domain Controller
Step 2: Schedule Agent Upgrade
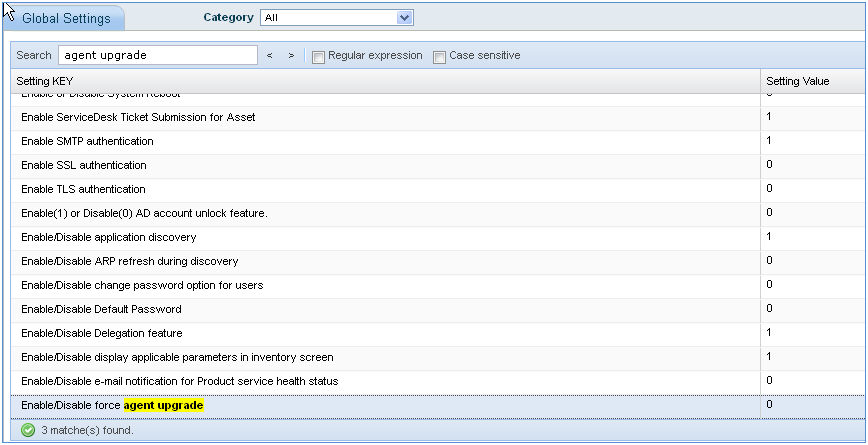
Based on the global settings key “Enable/Disable force agent upgrade”, you can schedule the agent upgrade. The default value is 1, i.e. once the patch is updated, all the agents are forced to upgrade.
To change the global settings key,
Go to Settings tab ->Advanced System Settings-> Global Settings
Change setting key “Enable/Disable force agent upgrade” to 1
Go to Settings tab ->IT Automation-> Schedule Agent Upgrade
Click “Add”

1. Enter the name of the agent scheduler
2. Select the criteria to select ‘Hosts’ or agent nodes. The inclusion type could be nodes, master agents or organization unit
3. Enter the schedule time for agent upgrade
4. Select the agent nodes to be upgraded and click the 'Update' button to save the agent schedule configuration. This configuration can later be edited.
Note: You can use Advanced Search to search for agent nodes based on the filters provided.
Once the agent upgrade schedule rule is created, it will be displayed in the “Schedule Agent Upgrade” listing page.
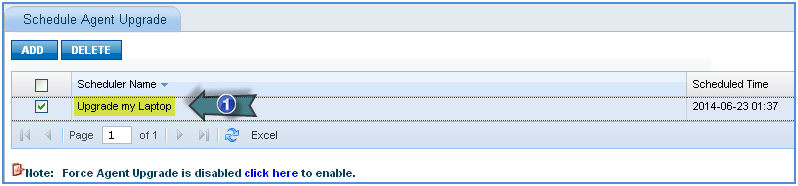
1. Click here to edit the agent upgrade rule.
Check the rule name and click “DELETE” to delete the agent upgrade rule.
Troubleshooting Guidelines for Manual Agent Installation errors
System Errors
System Administrator must have the rights to install the agent else “Access Denied” error occurs and the agent installation will get corrupted.
Log File Analysis
The following are the log files that are related to this module
File Name |
Purpose |
SapphireIMSAgent.log |
Complete flow of the agent node can be traced here. |
Note 1: The log files are available in <Installed-Path>\\log. You can also locate a file with the .bak extension.
Environment Specific Debugging
If any issues are faced, then please stop the anti-virus and install the agent.
Troubleshooting Guidelines for Agent Discovery errors
Ensure that SapphireIMSAgent and SapphireIMSAgentupgrade service is in "Started" mode.
Ensure that the agent is able to communicate to SapphireIMS Server using the http protocol. To check the communication, execute the Agent Diag and check the Diag log.
Check the execution of the wbemtest
Check the availability of the agent license
If the environment is a data collector environment, make sure that the Data collector is in the "Running" mode.
Finally check the registry as follows
Path for 32 bit : HKLM/Software/Tecknodreams/SapphireIMSAgent
Path for 64 bit : HKLM/Software/Wow6432Node/Tecknodreams/SapphireIMSAgent
KeyName : SapphireID.
Check if the key is created. If it is created, the agent is discovered successfully.
Log File Analysis
The following are the log files that are related to this module
File Name |
Purpose |
SapphireIMSAgent.log |
Complete flow of the agent node can be traced here. |
SapphireWS.log |
Complete web service flow can be traced here |
Note 1: The log files are available in <Installed-Path>\\log. You will also locate a file with the .bak extension.
Note 2: The log files are available in <Installed-Path>\Webmanagement\Standalone\logs. You will also locate a file with the .bak extension.